In today’s fast-paced world, where data has become the cornerstone of decision-making in both personal and professional contexts, the ability to manage and manipulate data efficiently is of utmost importance. One of the most common data formats is the Comma Separated Values (CSV) file, which stores data in a simple text format, making it easy to import and export information between different applications. However, managing CSV files can be cumbersome, especially when you need to convert them into different formats.
Enter CSV Master File Converter by Droidrocks – the ultimate solution for all your CSV file conversion needs! This powerful and user-friendly app allows you to convert CSV files into a wide range of formats, including PDF, XML, XLS, XLSX, DOCX, Text, HTML, JSON, and .db. Designed to simplify your file conversions, CSV Master File Converter offers a seamless experience that lets you focus on your work while our app takes care of the rest. In this blog post, we’ll take a deep dive into the features and benefits of CSV Master File Converter and explain how it can revolutionize your file conversion process.
Comprehensive Format Support
One of the key features of CSV Master File Converter is its ability to convert CSV files into a multitude of popular formats. This comprehensive format support caters to all your professional and personal requirements, ensuring that you can easily convert your CSV files into the exact format you need. Some of the supported formats include:
PDF: Portable Document Format, widely used for sharing documents that maintain their formatting across different devices and platforms.
XML: Extensible Markup Language, a versatile format used for encoding documents in a way that is both human-readable and machine-readable.
XLS and XLSX: Microsoft Excel file formats, used for storing and managing spreadsheet data.
DOCX: Microsoft Word file format, used for creating and editing text documents.
Text: Plain text format, suitable for simple note-taking and data storage.
HTML: Hypertext Markup Language, used for creating web pages and web applications.
JSON: JavaScript Object Notation, a lightweight data interchange format that is easy to read and write for humans and machines.
.db: Database file format, used for storing and managing structured data.
User-friendly Interface
At Droidrocks, we understand that not everyone is tech-savvy, which is why we have designed CSV Master File Converter with a user-friendly interface that allows even novice users to convert CSV files quickly and efficiently. With just a few taps, you can easily navigate through the app and convert your CSV files into your desired format.
Flexible Conversion Options
CSV Master File Converter offers a range of flexible conversion options with different row limits depending on the output format. This ensures that you get the best possible results for your specific needs. Whether you’re working with a small dataset or a large one, CSV Master File Converter has you covered.
[wpcode id=”1678″]
Secure and Private File Conversions
Your data security and privacy are of paramount importance to us. That’s why CSV Master File Converter performs all conversions locally on your device, without uploading your files to any external servers. This ensures that your data remains secure and private, giving you peace of mind.
Effortless File Sharing
With CSV Master File Converter, sharing your converted files has never been easier. The app allows you to share your files via email, messaging apps, or cloud storage services, making it convenient for both personal and professional use. No more struggling with complicated file-sharing processes!
View and Share Supported Files
In addition to its powerful conversion capabilities, CSV Master File Converter also serves as a file viewer for supported formats. This means you can not only convert CSV files but also use our app to view and share files in formats like PDF, XML, XLS, XLSX, DOCX, Text, HTML, JSON, and .db. This enhanced functionality makes CSV Master File Converter a comprehensive file management solution, streamlining your workflow and reducing the need for multiple apps.
Regular Updates and Dedicated Support
At Droidrocks, we are committed to providing you with the best experience possible. Our team of developers is constantly working on updates and improvements to ensure that CSV Master File Converter’s functionality, performance, and compatibility with the latest devices remain top-notch. Furthermore, our dedicated support team is always available to assist you with any questions or concerns you may have, ensuring a smooth and hassle-free user experience.
Trusted Developer
Droidrocks is a renowned developer with a reputation for creating high-quality apps that cater to the needs of diverse users. Our commitment to excellence ensures that you’ll receive a top-notch product and service when you choose CSV Master File Converter. We stand by our products and strive to create apps that genuinely make a difference in the lives of our users.
CSV Master File Converter by Droidrocks is the ultimate solution for all your CSV file conversion needs. With its comprehensive format support, user-friendly interface, flexible conversion options, secure and private file conversions, effortless file sharing, file viewing and sharing capabilities, regular updates, dedicated support, and the backing of a trusted developer, there’s no reason not to give CSV Master File Converter a try.
Experience the ultimate CSV file management solution with CSV Master File Converter by Droidrocks. Download now and revolutionize your file conversion process! Say goodbye to the hassles of managing CSV files and unlock the full potential of your data with this powerful and versatile tool.
if you want to read our other posts you can check our blog section.
As Android app developers, it’s important to keep our applications up to date with the latest features and bug fixes. However, ensuring that users download and install these updates can be challenging. In this blog post, we will explore a simple and efficient solution for implementing in-app updates using the Google Play Core library. This approach ensures a seamless user experience by prompting users to update their app without leaving the app itself.
Setting up the UpdateChecker class
To get started, we need to create a utility class called UpdateChecker. This class will handle checking for updates and initiating the update process if required. Before using this class, make sure to add the Google Play Core library to your project by adding the following line to your app-level build.gradle file:
public class UpdateChecker {

    public static final int UPDATE_REQUEST_CODE = 123;

    public static void checkForUpdates(@NonNull Activity activity) {
        // Create an instance of the AppUpdateManager
        AppUpdateManager appUpdateManager = AppUpdateManagerFactory.create(activity);

        // Check for updates
        appUpdateManager.getAppUpdateInfo().addOnSuccessListener(appUpdateInfo -> {
            if (appUpdateInfo.updateAvailability() == UpdateAvailability.UPDATE_AVAILABLE
                    && appUpdateInfo.isUpdateTypeAllowed(AppUpdateType.IMMEDIATE)) {
                // If an update is available and allowed, start the update flow
                try {
                    appUpdateManager.startUpdateFlowForResult(
                            appUpdateInfo,
                            AppUpdateType.IMMEDIATE,
                            activity,
                            UPDATE_REQUEST_CODE);
                } catch (IntentSender.SendIntentException e) {
                    e.printStackTrace();
                }
            }
        });
    }
}
Understanding the UpdateChecker class
The UpdateChecker class has a single method called checkForUpdates() that takes an Activity as its parameter. This method does the following:
Creates an instance of the AppUpdateManager using the AppUpdateManagerFactory.create(activity) method. The AppUpdateManager is responsible for checking and initiating updates.
Calls the getAppUpdateInfo() method on the AppUpdateManager instance, which returns a Task<AppUpdateInfo>. This task provides information about the availability of updates.
Adds an OnSuccessListener to the task. If the task is successful, it checks whether an update is available and allowed by the app’s configuration. If an update is available and allowed, it starts the update flow using the startUpdateFlowForResult() method.
Using the UpdateChecker class in your app
To use the UpdateChecker class in your app, simply call the checkForUpdates() method in your Activity‘s onCreate() method or at any other point where you’d like to check for updates:
After the update process is completed, the AppUpdateManager will return a result to the Activity. To handle this result, override the onActivityResult() method in your Activity:
@Override
  protected void onActivityResult(int requestCode, int resultCode, @Nullable Intent data) {
      super.onActivityResult(requestCode, resultCode, data);

      if (requestCode == UpdateChecker.UPDATE_REQUEST_CODE) {
          if (resultCode != RESULT_OK) {
              // Handle update failure or cancellation
              Log.d(TAG, "onActivityResult: update failure or cancellation");
          }
      }

  }
implementing in-app updates for Android applications is a crucial step in ensuring that users have access to the latest features and bug fixes. By using the Google Play Core library and the UpdateChecker class demonstrated in this tutorial, developers can create a seamless user experience that promotes app updates without leaving the app itself. This approach not only enhances user satisfaction but also contributes to the overall success and adoption of your application. As Android continues to evolve, staying up-to-date with best practices and leveraging in-app updates will help your app stay competitive and relevant in the ever-changing app ecosystem.
if you want to read our other posts you can check our blog section.
Bengali literature has a rich and diverse history, and there’s no better way to explore it than through eBooks. With the rise of smartphones and tablets, reading books has never been easier, and there are a plethora of Android apps available that offer free access to Bengali eBooks. These apps provide a vast collection of eBooks that can be read on the go and offer a great way for book lovers to discover new and classic literature in the Bengali language.
In this discussion, we will be exploring 5 must-have Android apps for all book lovers who are interested in reading Bengali eBooks. These apps offer a wide range of eBooks that cover a variety of genres, including fiction, non-fiction, poetry, and more. Whether you’re a casual reader or a literature enthusiast, these apps are sure to provide you with hours of entertainment and knowledge. Let’s get started!
The world of literature has seen a remarkable transformation in recent years with the advent of e-books. With more and more people turning to digital reading, the convenience and accessibility of e-books have opened up new avenues for book lovers worldwide. In Bangladesh, the trend of e-books has been gaining popularity in recent years. And the “বইমেলা – Read Bangla E-Books” app is one such platform that has been providing an immersive reading experience to Bengali literature enthusiasts.
The “বইমেলা Boimela Bangla E-Books” app is a user-friendly app that provides an extensive collection of Bangla e-books. With features like dark mode, unlimited access to Bangla e-books, and bookmarking, the app offers a personalized and comfortable reading experience. Whether it’s Bengali stories, horror, business, politics, comedy, drama, or poems, this app covers it all. It has a vast library of e-books that is constantly growing, so users will always have new books to explore and discover.
One of the most notable features of the “বইমেলা – Read Bangla E-Books” app is its easy-to-use interface. The app is designed to provide an immersive reading experience in Bangla. It is user-friendly, and even new users can navigate their way through it easily. Moreover, the app’s dark mode feature allows users to read comfortably at night, without straining their eyes.
While the app offers a vast collection of e-books, it’s important to note that the e-books available in the app have been collected from publicly available sources on the internet. The publisher of this app does not hold any rights to the e-books. However, the app is solely for the purpose of providing easy access and convenience to the books. The app takes pride in ensuring the quality of its e-books and offering a smooth reading experience to its users.
In conclusion, the “বইমেলা – Read Bangla E-Books” app is a great platform for all Bangla literature enthusiasts. With its user-friendly interface, extensive collection of e-books, and personalized features, the app offers a reading experience like no other. And with the constant growth of its library, users will always have something new to read and explore. The app is a testament to the changing landscape of literature, and it’s exciting to see how digital reading is shaping the future of books.
Boitoi is a digital publishing platform that focuses on the Bangla eBook publishing industry. The app has quickly gained popularity among Bangla literature enthusiasts as it provides a great eBook reader and an eBook store that helps users find and read their favourite books easily.
One of the key features of the Boitoi app is its user-friendly interface. The app is easy to navigate, and users can find the books they’re looking for with ease. With a vast collection of Bangla eBooks, Boitoi provides an immersive reading experience to its users. From Bengali stories to horror, business, politics, comedy, drama, poems, and much more, Boitoi has an extensive range of eBooks to choose from.
The app also has a great eBook reader that provides a seamless reading experience. With features like dark mode, adjustable text size, and bookmarking, Boitoi provides a personalized reading experience to its users. The dark mode feature allows users to read comfortably at night, and the adjustable text size feature ensures that users can read at a font size that’s comfortable for them.
Boitoi’s eBook store is another feature that has made it popular among Bangla literature enthusiasts. The store is updated regularly, and users can find the latest books in various genres. The app also has a section where users can discover new and trending books, making it easier for them to find their next read. Moreover, the app has a great search feature that helps users find books by title, author, or genre.
One of the unique features of Boitoi is that it allows authors to publish their eBooks on the app. This means that users can find books from both popular and upcoming authors, making it a great platform for discovering new and exciting writers.
Overall, the Boitoi app has revolutionized the Bangla eBook publishing industry. It has provided an easy and convenient platform for readers to access a vast collection of Bangla eBooks. With its user-friendly interface, great eBook reader, and eBook store, Boitoi has quickly become a popular app among Bangla literature enthusiasts. The app is a testament to the changing landscape of the publishing industry and how digital platforms are shaping the future of reading.
Amar Library: Bangla eBook is a comprehensive digital library platform that provides users with access to over 11,000 Bangla eBooks from 700+ authors and 90+ publishers. This app is a must-have for any avid reader who loves to read books in their native language. It’s a one-stop shop for all your reading needs, from classic novels to contemporary works of fiction, self-help books to motivational stories, religious texts to scientific works, and much more.
The app features a user-friendly interface that allows users to easily download, read, and navigate through their favorite books. With the Felix mode and quick load feature, users can enjoy a comfortable and smooth reading experience. The app’s search function makes it easy to find specific books or authors, making it a time-saving and convenient tool for readers.
One of the best things about the Amar Library app is that all books are free, which means you can download and read as many books as you want without having to worry about subscription fees. With over 190+ categories of books, there is something for everyone. The app includes a vast collection of books ranging from Quran Sharif and religious texts to poetry and love stories. It also features books on lifestyle, health issues, cooking, and recipes, general knowledge, music, and much more.
The app has a unique feature that allows users to unlock premium books by completing various tasks, which adds a fun and engaging element to the reading experience. There are also popular Bangla characters like Himu, Misir Ali, Tin Goyenda, Kakababu, and Harry Potter, making the app a favorite among all age groups.
The app includes works by renowned authors like Rabindranath Tagore, Kazi Nazrul Islam, Sharat Chandra, Humayun Ahmed, and many more. With over 90+ publishers, including Ankur, Suchipatra, Rodela, and Nazrul Institute, the app offers a diverse range of works.
In conclusion, the Amar Library: Bangla eBook app is an excellent digital library that offers a vast collection of books in Bangla. With its user-friendly interface, free books, and vast collection of books, it’s a must-have app for anyone who loves to read in Bangla. Whether you’re looking for classic works of literature or the latest bestsellers, the Amar Library app has something for everyone. So, join Amar Library today and immerse yourself in the world of Bangla eBooks.
Boighor is an innovative and user-friendly app designed to provide an unparalleled reading experience in Bengali and English. With its extensive library of books, captivating audiobooks, and smart UI design, Boighor is an essential app for book lovers who want to indulge in the literary world.
The app boasts the largest collection of Bengali eBooks and audiobooks in the country, with books of all genres available, ranging from classic to contemporary, science fiction to romance, horror to motivational, and more. It offers popular books by renowned authors from home and abroad, as well as works from promising up-and-coming writers.
In addition to a vast collection of Bengali books, Boighor also offers the best of English classics, making it a must-have app for those who enjoy reading in both languages. Boighor offers numerous free books and attractive promotional offers to make reading more accessible to everyone.
Boighor stands out as the best app for book lovers because of its user-friendly UI design, which gives readers the feel of reading a paper book with page transitions. The app allows for font type and size customization, background color, and brightness customization, and night mode, making it easy to read in any lighting condition. Additionally, readers can highlight their favorite parts or memorable quotes and download eBooks for offline reading.
The app also provides a smart searching system that allows users to find their favorite books easily. Boighor can be accessed on any device or web browser, making it easy to read on the go.
One of the most impressive features of Boighor is the weekly addition of new eBooks and audiobooks. This ensures that readers always have fresh and exciting content to explore. Moreover, the app offers the best eBook service at a relatively low price, making it an affordable and convenient option for avid readers.
In conclusion, Boighor is a must-have app for anyone who loves reading in Bengali and English. With its vast collection of books, user-friendly UI, and attractive promotional offers, Boighor offers the best eBook service for book lovers at a relatively low cost.
Sheiboi is a one-stop solution for all Bengali book enthusiasts who wish to explore the vast universe of Bengali literature. This app offers an unparalleled experience to the readers by providing the largest e-book store for Bengali e-books in Bangladesh. The app serves as an e-commerce platform, a book reader, and an extensive library with a collection of over 2800 e-books, 500 authors, and 50 publishers.
One of the most striking features of Sheiboi is its collection of 500+ free books that cater to the needs of budget-conscious readers. Furthermore, the app has an easy payment method that allows the users to purchase their favorite books with bKash, Rocket, Debit/Credit Card, Robi & Airtel using their mobile balance. The users can download free book samples before making a purchase, which gives them a chance to explore the contents before investing in a particular book.
Sheiboi offers an extensive range of categories, including Quran Sharif, Islamic, Religious, Mythological, Ramayana, Famous Translated Books, International Best Seller, Motivation, Story, Dictionary, ICT, Biography, Law, Self-Development, Drama, Film & Movies, Novel, Music, Magazine, Horror, Adult, Mystery, Adventure, Agriculture, General Knowledge, Lifestyle, Cooking & Recipe, Style & Fashion, Health Issues, Comics, Children’s Book, Poetry, Love, Career, Youth Novel, Detective, Science Fiction, Nature, Philosophy, Sales & Marketing, Articles, Reporting, Travel Stories, Russian, Fantasy, Muktijuddho, Bangabandhu, Computer, Jokes, Freelancing & Outsourcing, Job, Business, Western, Crusade & many more. It encompasses all literary genres and serves as a treasure trove for readers with diverse interests.
One of the most impressive aspects of Sheiboi is its range of legendary characters such as Himu, Misir Ali, Tin Goyenda, Kakababu, Harry Potter, Thakur Mar Jhuli, Frankenstein, Tarzan, Aladdin, Lenin, Pagla Dashu, Sultan Suleman, Sherlock Holmes, Guillivers Travel, Dracula, Crusade Series & more. The app also has a plethora of over 500+ authors, including classical, Rabindranath Tagore, Kazi Nazrul Islam, Sharat Chandra, Sukanto, Sukumar Ray, Bivhutibushan, Bankimchadra, Manik, Hemendrakumar, Upendrokishor, Ishwarchandra, Modhusudan, Jibonanondo & more. Furthermore, it has books by contemporary writers such as Humayun Ahmed, Muhammad Zafar Iqbal, Selina Hossain, Rakib Hasan, Ahsan Habib, Anisul Hoq, Nirmolendu, Shamsul Haque, Hasan Azizul Haque, Anish Das Apu, Shirshendu, Sunil, Samaresh, Shibram, Sanjib, Iftekhar Amin, Shaykh Seraj, Arundhati Roy.
Another great feature of Sheiboi is its user-friendly interface. The app is designed with an intuitive and easy-to-use interface, allowing users to easily navigate through the different categories of books and search for their desired titles. The app also allows users to customize their reading experience by choosing their preferred font size, background color, and reading mode. The day/night mode feature also makes it easy to read at any time of the day, whether in bright daylight or in the dark.
Moreover, Sheiboi is also an eCommerce platform where users can purchase books with ease. The app supports multiple payment methods, including bKash, Rocket, Debit/Credit Card, Robi, and Airtel using their mobile balance. This makes it easy and convenient for users to purchase their favorite books without leaving the comfort of their homes.
Sheiboi offers a wide range of categories of books to choose from, including religious, mythological, self-development, biographies, fiction, non-fiction, magazines, and many more. The app also boasts an impressive collection of legendary characters like Himu, Misir Ali, Tin Goyenda, Kakababu, and Harry Potter, among others.
With over 500+ authors, Sheiboi offers a vast collection of classical and modern Bengali literature. From Rabindranath Tagore to Kazi Nazrul Islam, from Sharat Chandra to Sunil Gangopadhyay, users can find all their favorite authors on the app. In addition, the app also features contemporary authors like Humayun Ahmed, Muhammad Zafar Iqbal, Selina Hossain, and Anisul Hoque, among many others.
Overall, Sheiboi is a great platform for anyone who loves Bengali literature. With its vast collection of books, user-friendly interface, and easy payment options, it offers a convenient and enjoyable reading experience for book lovers everywhere.
In conclusion, eBooks and audiobooks have revolutionized the way people consume literature, making it easier and more convenient for readers to access their favorite books. With the proliferation of smartphones and tablets, eBook and audiobook apps have become increasingly popular. Boighor and Sheiboi are two examples of such apps that cater specifically to Bengali literature. Boighor provides the largest library of Bengali books in the country, offering readers an impressive collection of books across a wide range of genres. Sheiboi, on the other hand, is the largest e-book store in Bangladesh and features over 2,800 books from more than 500 authors and 50 publishers. Both apps offer users an easy-to-use interface, customization options, and a low-cost way to purchase eBooks. Overall, these apps are a testament to the growing popularity of eBooks and audiobooks and their role in transforming the way people read and access literature.
if you want to read our other posts you can check our blog section.
Welcome to my blog post on “Mastering Java 8: Essential Key Features for Next-Level Programming”! As a Java developer, you may already be familiar with the language and its basics, but if you want to take your skills to the next level, it’s essential to master the key features of Java 8. With the release of Java 8 in 2014, the language introduced many new features and enhancements, making it more powerful and efficient than ever before.
In this post, we’ll dive into the essential key features of Java 8 that every developer should know. We’ll cover topics such as lambda expressions, the Stream API, functional interfaces, and more. By the end of this post, you’ll have a solid understanding of these key features and be ready to take your Java programming to the next level.
So, whether you’re a beginner or an experienced Java developer looking to up your game, let’s get started on mastering Java 8!
Java 8 brought a wide range of new features that increased its versatility and flexibility, including those that made functional programming possible. Among the key additions are Lambda Expressions, Functional Interfaces, Stream API, Default Methods, Method References, Optional, and Date/Time API.
In this blog post, we will explore Lambda Expressions, Functional Interfaces, and Stream API in detail with practical examples. By delving into these essential features, you’ll gain a better understanding of how they work, their benefits, and how they can be applied to make your code more efficient and effective.
Lambda Expressions
Lambda expressions are one of the most significant features introduced in Java 8. They allow you to write code in a more concise and expressive way, reducing boilerplate code, and making your code more readable and maintainable.
In essence, a lambda expression is a way of representing a block of code as a value that can be passed around like any other object. It is an anonymous function that can be treated as a method argument or a return value. By using lambda expressions, you can implement functional interfaces (interfaces that have only one abstract method) more easily and without the need to create a separate class.
Here’s a simple example of a lambda expression:
List<Integer> numbers = Arrays.asList(1, 2, 3, 4, 5);

// Before Java 8
numbers.forEach(new Consumer<Integer>() {
    public void accept(Integer number) {
        System.out.println(number);
    }
});

// With lambda expressions
numbers.forEach(number -> System.out.println(number));
In this example, the forEach method is being used to iterate over the numbers list and print each element to the console. Before Java 8, this required creating an anonymous class that implements the Consumer interface, which had only one method accept(). With lambda expressions, we can replace the anonymous class with a lambda expression that takes a single argument (number), and calls a single method (println) on that argument.
Lambda expressions can also be used in more complex scenarios, such as filtering and mapping collections, sorting data, or creating event listeners. With their concise syntax and ability to make code more readable, lambda expressions are a valuable addition to any Java developer’s toolkit.
Why is it called Lambda?
The term “lambda” comes from the field of mathematics, where lambda calculus is a formal system for expressing computations based on function abstraction and application using variable binding and substitution.
In computer science, lambda expressions are a way of expressing functional programming concepts in a more concise and expressive way, similar to how lambda calculus does in mathematics. The use of the term “lambda” in programming languages can be traced back to the Lisp programming language, which introduced the lambda function as a way of defining anonymous functions.
In Java 8, the term “lambda expression” was chosen to reflect the mathematical and functional programming roots of this feature. The syntax for defining a lambda expression in Java resembles the syntax used in lambda calculus, and the use of the term “lambda” reflects the connection to this field of mathematics.
So, in short, lambda expressions are called “lambda” because they are a programming language feature that derives from mathematical lambda calculus, and the name was carried over from earlier programming languages that used the term.
What is the benefit of Lambda?
Lambda expressions provide several benefits in Java programming, including:
Conciseness and readability: Lambda expressions allow you to write shorter and more readable code, making it easier to understand the intent of the code. By reducing the amount of boilerplate code, it becomes easier to focus on the essential logic of the program.
Flexibility and versatility: Lambda expressions can be used in a wide variety of scenarios, including collection processing, event handling, and concurrency. They can be used to express a range of functional programming concepts, such as mapping, filtering, and reducing data.
Improved performance: Lambda expressions can improve performance in some scenarios by allowing code to be executed in a more parallel or asynchronous way, taking advantage of multi-core processors.
Better APIs: The use of lambda expressions in APIs can make the APIs more expressive and easier to use. APIs that use functional interfaces can be composed more easily and can provide more flexibility to the caller.
Compatibility: The addition of lambda expressions in Java 8 did not break compatibility with earlier versions of Java. Code that was written before Java 8 can continue to work, while new code can take advantage of the benefits of lambda expressions.
Overall, lambda expressions are a powerful tool that can help to make Java code more expressive, flexible, and efficient. They are a valuable addition to the Java language that can help to simplify programming tasks and make it easier to write high-quality, maintainable code.
What are the advantage and disadvantage of lambda expression in Java?
here are some advantages and disadvantages of using lambda expressions in Java programming:
Advantages:
Concise and readable code: Lambda expressions can reduce the amount of boilerplate code required to perform common operations, making the code more concise and easier to read.
Increased productivity: By reducing the amount of code that needs to be written, lambda expressions can help to increase productivity and reduce development time.
Improved API design: Lambda expressions can be used to create more expressive and flexible APIs that are easier to use.
Parallelism: Lambda expressions can enable parallel processing of data, which can result in better performance and scalability in multi-core systems.
Compatibility: Lambda expressions are backward compatible with previous versions of Java, allowing developers to take advantage of the feature without breaking existing code.
Disadvantages:
Learning curve: Lambda expressions can be challenging for developers who are not familiar with functional programming concepts.
Reduced readability: Lambda expressions can be difficult to read if they are too complex, making the code less maintainable.
Limited use cases: Lambda expressions are most useful in scenarios where functional programming concepts are applicable. In other cases, they may not provide significant benefits.
Debugging: Debugging code that uses lambda expressions can be more challenging than debugging traditional code.
Performance overhead: In some scenarios, the use of lambda expressions can introduce performance overhead, particularly when they are used in very small code blocks.
lambda expressions can provide significant benefits in terms of code conciseness, productivity, and API design, but they also come with some potential downsides, particularly around readability and performance. Developers should weigh these advantages and disadvantages when deciding whether to use lambda expressions in their Java code.
What is the type of lambda expressions?
Lambda expressions in Java do not have a specific type, but they can be assigned to functional interfaces. A functional interface is an interface that has only one abstract method, and it serves as the target type for lambda expressions.
When a lambda expression is used, the Java compiler infers the target type from the context in which the expression is used. The target type must be a functional interface that is compatible with the lambda expression. In other words, the parameters and return type of the lambda expression must match the parameters and return type of the abstract method in the target functional interface.
For example, consider the following functional interface:
interface MyFunction {
    int apply(int x, int y);
}
This interface has only one abstract method, apply, which takes two integers as parameters and returns an integer. We can use a lambda expression to implement this interface:
MyFunction add = (x, y) -> x + y;
In this example, we have assigned a lambda expression to a variable of type MyFunction. The lambda expression takes two integers as parameters and returns their sum. The Java compiler infers that the target type of the lambda expression is MyFunction, and verifies that the lambda expression is compatible with the abstract method applied in the MyFunction interface.
Lambda expressions can be assigned to any functional interface that has only one abstract method, making them a powerful tool for writing concise, expressive code in Java.
Functional interfaces in java 8
In Java 8, functional interfaces are interfaces that define a single abstract method, also known as a functional method. Functional interfaces are the basis of the lambda expressions feature in Java 8, and they are used to represent functions as objects.
Functional interfaces are annotated with the @FunctionalInterface annotation, which indicates that the interface is intended to be used as a functional interface. This annotation is optional but recommended, as it allows the Java compiler to enforce the single abstract method requirement.
Functional interfaces can be used in a variety of scenarios, including event handling, data processing, and concurrency. Some of the most commonly used functional interfaces in Java 8 include:
Consumer<T>: Accepts a single input argument of type T and performs an operation on it.
Function<T, R>: Accepts a single input argument of type T and returns a result of type R.
Predicate<T>: Accepts a single input argument of type T and returns a boolean value.
Supplier<T>: Returns a value of type T.
Here’s an example of a simple functional interface and how it can be used with a lambda expression:
@FunctionalInterface
interface MyFunction {
    int apply(int a, int b);
}

public class Main {
    public static void main(String[] args) {
        MyFunction add = (a, b) -> a + b;
        System.out.println(add.apply(2, 3)); // Output: 5
    }
}
In this example, we define a functional interface called MyFunction with a single abstract method apply. We then create a lambda expression that implements the apply method by adding two integers together. Finally, we invoke the apply method on the lambda expression to get the result.
What are the advantages of functional interface in Java?
Functional interfaces provide several advantages in Java:
Support for lambda expressions: Functional interfaces are designed to work with lambda expressions, which are a powerful feature introduced in Java 8. Lambda expressions allow developers to write shorter and more readable code, and can significantly reduce the amount of boilerplate code required for common operations.
Flexibility: Functional interfaces are flexible and can be used in a wide range of scenarios, including event handling, data processing, and concurrency. They can also be used to create custom functional interfaces that meet specific requirements.
Code readability: Because functional interfaces have a single abstract method, they are easy to read and understand. This makes code more maintainable and reduces the likelihood of errors.
Type safety: Functional interfaces provide type safety by allowing the Java compiler to check that the interface is being used correctly. This can help to prevent runtime errors and improve the reliability of code.
API design: Functional interfaces can be used to create more expressive and flexible APIs that are easier to use. They can also be used to create extension methods, which can further improve API design.
functional interfaces provide several advantages in Java, including support for lambda expressions, flexibility, code readability, type safety, and improved API design. By using functional interfaces, developers can write more concise, readable, and maintainable code that is less prone to errors.
What are the disadvantages of functional interface in Java?
While functional interfaces provide many advantages, there are also some potential disadvantages to be aware of in Java:
Learning curve: Functional programming concepts can be difficult to learn for developers who are used to more traditional imperative programming styles. The use of lambda expressions and functional interfaces may require a new way of thinking and can take time to master.
Debugging: Debugging code that uses lambda expressions and functional interfaces can be more challenging than traditional imperative code. This is because lambda expressions are anonymous methods and can’t be directly referenced or inspected in a debugger.
Performance: The use of lambda expressions and functional interfaces may impact performance due to the overhead of creating objects and invoking methods. However, in most cases, the performance impact is negligible.
API backward compatibility: In some cases, adding functional interfaces to existing APIs can break backward compatibility. This is because existing code that relies on the old API may no longer work as expected.
Code readability: While functional interfaces can improve code readability, they can also make code more complex if used excessively. This can make it harder for developers to understand and maintain the code.
while functional interfaces provide many advantages, there are also potential disadvantages to be aware of. These include the learning curve, debugging challenges, performance impact, API backward compatibility issues, and the potential for decreased code readability if used excessively. However, with careful use and consideration, the benefits of functional interfaces often outweigh the potential drawbacks.
Stream API
Stream API is a feature introduced in Java 8 that allows developers to easily and efficiently process collections of objects. It provides a fluent, declarative, and functional approach to manipulating collections that can be more expressive and concise than traditional loop-based approaches.
Stream API provides a functional approach to working with collections of objects. It allows you to chain together a series of operations to process a collection, using a fluent and declarative syntax.
There are two types of operations that can be performed on a Stream:
Intermediate operations: These are operations that transform a Stream into another Stream. They include operations like filter(), map(), and flatMap(). Intermediate operations are lazy, meaning that they do not process the elements of the Stream until a terminal operation is performed.
Terminal operations: These are operations that produce a result or a side-effect. They include operations like forEach(), reduce(), and collect(). Terminal operations are eager, meaning that they process the elements of the Stream as soon as they are invoked.
Stream API also supports parallel processing, which means that it can split a collection into multiple parts and process each part on a separate core of a machine. This can provide significant performance gains for large collections.
Another advantage of Stream API is that it works seamlessly with lambdas, which allows you to write concise and expressive code. For example, here’s how you can use Stream API to filter and sort a collection of strings:
In this example, we use the stream() method to create a Stream from the List of strings. We then chain together a filter() operation to keep only the strings that start with “b”, followed by a sorted() operation to sort the remaining strings. Finally, we use the collect() operation to collect the results into a new List.
In summary, Stream API provides a functional and declarative approach to working with collections of objects in Java. It supports intermediate and terminal operations, and parallel processing, and works seamlessly with Lambdas.
What are the advantages of Stream API in Java?
Here are some of the key advantages of using Stream API in Java:
Readable and concise code: Stream API provides a more concise and expressive way to manipulate collections of objects. It allows you to write code that is easier to read and understand, with fewer lines of code.
Parallel processing: Stream API can leverage multiple cores on a machine to process collections in parallel, which can provide significant performance gains for large collections.
Declarative approach: Stream API provides a declarative approach to data processing, which allows you to express what you want to do with the data, rather than how to do it. This can help to make your code more expressive and less prone to errors.
Improved code quality: Stream API encourages developers to write code that is more modular and composable. This can improve the quality of code, making it easier to test and maintain.
Integration with lambdas: Stream API is designed to work seamlessly with lambda expressions, which makes it easier to write code that is both readable and performant.
What are the disadvantages of Stream API in Java?
However, there are also some potential disadvantages to using Stream API. These include:
Learning curve: Learning how to use Stream API can take some time, especially for developers who are not familiar with functional programming concepts.
Performance tradeoffs: While Stream API can provide significant performance gains for large collections, it may not be as performant as traditional loop-based approaches for smaller collections.
Complexity: Stream API can be more complex to use than traditional loop-based approaches, especially for more complex operations. This can make it more difficult for developers to understand and debug code.
Stream API provides several advantages in Java, including readable and concise code, parallel processing, a declarative approach, improved code quality, and integration with lambdas. However, there are also potential disadvantages to be aware of, including a learning curve, performance tradeoffs, and increased complexity.
Date/Time API JAVA 8
The Date/Time API in Java 8 is a powerful feature that provides developers with a more intuitive and efficient way to work with dates and times in Java applications. With the new Date/Time API, developers can perform complex operations such as time zone conversion, daylight saving time adjustments, and date/time formatting in a much easier way.
The API includes several new classes, such as LocalDate, LocalTime, and LocalDateTime, which provide a simpler and more efficient way to represent dates and times. Additionally, the API includes features such as a fluent interface, improved parsing and formatting, and support for time zones and daylight saving time adjustments.
Overall, the Date/Time API in Java 8 makes it easier for developers to work with dates and times in Java applications, and provides a more intuitive and efficient way to perform complex operations. By taking advantage of this feature, developers can write more effective and efficient code, and create better applications.
here’s an example of how to use the Date/Time API in Java 8:
import java.time.LocalDate;
import java.time.Month;

public class DateExample {
    public static void main(String[] args) {
        LocalDate date = LocalDate.of(2022, Month.MARCH, 10);
        LocalDate now = LocalDate.now();

        if (date.isAfter(now)) {
            System.out.println("The date is in the future!");
        } else {
            System.out.println("The date is in the past.");
        }
    }
}
In this example, we use the LocalDate class to create a date representing March 10th, 2022. We then use the now() method to get the current date, and compare it to the date we just created using the isAfter() method. If the date we created is in the future, we print a message saying so, otherwise, we print a message saying that the date is in the past. This is just a simple example, but it demonstrates the basic usage of the Date/Time API in Java 8.
Optional in Java 8
Optional is a feature introduced in Java 8 that provides a more efficient and safer way to handle null values in Java applications. It is a container object that may or may not contain a non-null value, and is designed to help prevent null pointer exceptions.
Instead of using a null value to indicate that a value is absent, Optional allows developers to represent the absence of a value in a more explicit and clear way. Optional provides methods that allow developers to perform operations on the contained value, or provide a default value if the Optional object is empty.
Here’s an example of how to use Optional in Java 8:
import java.util.Optional;

public class OptionalExample {
    public static void main(String[] args) {
        String str = "Hello, world!";
        Optional<String> optionalStr = Optional.ofNullable(str);

        if (optionalStr.isPresent()) {
            System.out.println("The string is " + optionalStr.get());
        } else {
            System.out.println("The string is absent.");
        }
    }
}
In this example, we create an Optional object that contains a non-null value (a string that says “Hello, world!”). We then use the isPresent() method to check if the Optional object contains a value, and use the get() method to retrieve the value if it does. If the Optional object is empty, we print a message saying so. This simple example demonstrates the basic usage of Optional in Java 8.
Method References in java 8
Method references is a feature in Java 8 that provides a shorthand syntax for defining lambdas that call a specific method. It allows developers to write more concise and readable code by avoiding the need to explicitly define the lambda expression.
There are four types of method references in Java 8:
Reference to a static method
Reference to an instance method of an object of a particular class
Reference to an instance method of an arbitrary object of a particular type
Reference to a constructor
Here’s an example of how to use a method reference in Java 8:
import java.util.Arrays;
import java.util.List;

public class MethodReferenceExample {
    public static void main(String[] args) {
        List<String> words = Arrays.asList("foo", "bar", "baz");
        words.forEach(System.out::println);
    }
}
we use the forEach() method to iterate over a list of strings and print each one to the console. Instead of using a lambda expression to define the action that should be performed on each element, we use a method reference (System.out::println) to call the println() method of the System.out object. This makes the code more concise and readable. This is just a simple example, but it demonstrates the basic usage of method references in Java 8.
here are examples of the four types of method references in Java 8:
Reference to a static method:
import java.util.function.Function;

public class StaticMethodReferenceExample {
    public static void main(String[] args) {
        Function<String, Integer> parser = Integer::parseInt;
        Integer result = parser.apply("42");
        System.out.println(result);
    }
}
In this example, we define a Function that takes a String and returns an Integer. Instead of using a lambda expression to call the parseInt() method of the Integer class, we use a static method reference (Integer::parseInt) to call the method directly.
Reference to an instance method of an object of a particular class:
import java.util.function.Predicate;

public class InstanceMethodReferenceExample {
    public static void main(String[] args) {
        String str = "hello";
        Predicate<String> predicate = str::startsWith;
        boolean result = predicate.test("he");
        System.out.println(result);
    }
}
In this example, we define a Predicate that takes a String and returns a boolean. Instead of using a lambda expression to call the startsWith() method of the String class, we use an instance method reference (str::startsWith) to call the method on the object (in this case, the “hello” string).
Reference to an instance method of an arbitrary object of a particular type:
import java.util.function.BiFunction;

public class ArbitraryInstanceMethodReferenceExample {
    public static void main(String[] args) {
        BiFunction<String, String, Integer> compare = String::compareToIgnoreCase;
        Integer result = compare.apply("foo", "bar");
        System.out.println(result);
    }
}
In this example, we define a BiFunction that takes two strings and returns an integer. Instead of using a lambda expression to call the compareToIgnoreCase() method of one of the String objects, we use an arbitrary instance method reference (String::compareToIgnoreCase) to call the method on one of the input strings.
Reference to a constructor:
import java.util.function.Supplier;

public class ConstructorReferenceExample {
    public static void main(String[] args) {
        Supplier<StringBuilder> supplier = StringBuilder::new;
        StringBuilder sb = supplier.get();
        sb.append("hello");
        System.out.println(sb.toString());
    }
}
In this example, we define a Supplier that returns a new StringBuilder object. Instead of using a lambda expression to create a new object using the StringBuilder constructor, we use a constructor reference (StringBuilder::new) to create the object directly.
Best resources to learn java 8 features precisely
Here are five resources you can use to learn Java 8 features:
Oracle’s Java Tutorials: Oracle provides a comprehensive set of tutorials on Java 8, including topics such as Lambda Expressions, Functional Interfaces, Stream API, and Date/Time API. The tutorials are well-organized and cover the concepts in depth. You can find them at https://docs.oracle.com/javase/tutorial/java/index.html.
Java 8 in Action: This book by Raoul-Gabriel Urma, Mario Fusco, and Alan Mycroft provides a detailed overview of Java 8 features, including Lambda Expressions, Streams, and functional programming concepts. It includes numerous examples and exercises to help you solidify your understanding. You can find the book on Amazon or O’Reilly.
Java SE 8 for the Really Impatient: This book by Cay S. Horstmann is a short and concise guide to Java 8 features. It provides a quick overview of Lambda Expressions, Stream API, and Date/Time API, with numerous examples and code snippets. You can find the book on Amazon or O’Reilly.
Java 8 Features Tutorial on Baeldung: Baeldung is a popular Java blog that provides tutorials and articles on Java 8 features. Their Java 8 Features Tutorial provides a concise and well-organized overview of Java 8 features, including Lambda Expressions, Streams, and functional interfaces. You can find the tutorial at https://www.baeldung.com/java-8-features.
Java 8 Features on Vogella: Vogella is another popular Java tutorial website that provides a comprehensive set of tutorials on Java 8 features. Their Java 8 Features tutorial covers topics such as Lambda Expressions, Method References, Stream API, and Date/Time API, with examples and explanations. You can find the tutorial at https://www.vogella.com/tutorials/java-8-tutorial/.
Java 8 introduced several new features that made it more versatile and flexible. Lambda expressions, functional interfaces, and Stream API are some of the key features of Java 8 that allow developers to write more concise, expressive, and functional code.
Lambda expressions provide a way to write anonymous functions in Java, which can make code more readable and expressive. They are also a key part of the functional programming paradigm in Java.
Functional interfaces provide a way to define an interface that has only one abstract method. They are used extensively in Java 8 to enable functional programming.
Stream API provides a fluent and declarative way to manipulate collections of objects in Java. It supports parallel processing and works seamlessly with lambdas.
Overall, Java 8 features provide many advantages to developers, including more readable and expressive code, support for functional programming, improved performance, and improved code quality. However, there are also potential disadvantages to be aware of, such as a learning curve and increased complexity. By understanding and using these features effectively, developers can write more efficient and effective code in Java.
if you want to read our other posts you can check our blog section.
In recent years, artificial intelligence (AI) has made incredible advancements and is changing the way we live and work. One of the most exciting developments in AI is the creation of language models, and none is more impressive than OpenAI’s ChatGPT. This advanced language model has the ability to understand and generate human-like text, making it a game changer in the AI world. In this blog post, we will dive into the world of ChatGPT, exploring its capabilities and how it’s transforming the way we communicate and interact with technology. Whether you’re an AI enthusiast or just curious about the latest advancements, this post is a must-read. Get ready to discover the magic of ChatGPT!
What are ChatGPT?
ChatGPT is a state-of-the-art language model developed by OpenAI. It is based on transformer architecture and was trained on a large corpus of text data from the internet, making it capable of understanding and generating human-like text.
ChatGPT can be used for a variety of tasks such as text generation, question answering, language translation, and more. It has shown remarkable results in many benchmark tests and has been widely adopted by various industries and organizations.
The versatility and efficiency of ChatGPT have made it a popular tool for businesses looking to automate customer service, improve chatbots, and enhance conversational AI applications. With its ability to understand and generate text, ChatGPT is poised to play a significant role in shaping the future of AI and human-computer interaction.
ChatGPT meaning
ChatGPT is an acronym that stands for “Chat Generative Pretrained Transformer“. It is a language model developed by OpenAI that uses the transformer architecture and is trained on large amounts of text data. The model is designed to understand and generate human-like text, allowing it to perform a variety of natural languages processing tasks, such as text generation, question answering, and language translation.
By using the OpenAI API, developers can integrate ChatGPT into their applications and enable users to interact with the model in a conversational manner. This makes ChatGPT a powerful tool for building AI-powered chatbots, virtual assistants, and other applications that require advanced language processing capabilities.
Who owns ChatGPT?
ChatGPT is owned by OpenAI, a research organization and technology company that is dedicated to advancing artificial intelligence in a responsible and safe manner. OpenAI was founded in 2015 by a group of prominent technology leaders, including Elon Musk, Sam Altman, Greg Brockman, Ilya Sutskever, and Wojciech Zaremba, with the goal of ensuring that artificial general intelligence (AGI) benefits humanity as a whole.
OpenAI’s primary focus is on developing cutting-edge AI technologies and conducting research in the field of machine learning and artificial intelligence. The company is well-known for its work on language models, including ChatGPT, and its contributions to the AI community through open-source software and research publications.
Is ChatGPT free?
OpenAI provides access to ChatGPT through its API, which is not free. OpenAI charges for usage of its API based on the number of API calls and the number of computational resources required for each call. However, OpenAI does provide a limited number of free API calls for developers and researchers to test the model and evaluate its capabilities.
For businesses and organizations that require large-scale access to ChatGPT, OpenAI offers enterprise-level pricing packages with increased quotas, dedicated support, and additional features.
It is also worth noting that OpenAI has made some of the code and models for previous versions of GPT (Generative Pretrained Transformer) open source, which can be used for research and experimentation purposes. However, these models may not have the same performance and capabilities as the commercially available ChatGPT API.
how to use ChatGPT API?
Here’s a high-level overview of how to use ChatGPT:
Choose a use case: There are many different use cases for ChatGPT, including text generation, question answering, language translation, and more. Choose the use case that best fits your needs.
Access the OpenAI API: ChatGPT is accessed through the OpenAI API. You will need to sign up for an account, generate an API key, and choose a client library to interact with the API.
Prepare your input data: Depending on your use case, you will need to prepare input data to send to the API. For example, if you’re using ChatGPT for text generation, you may need to provide a prompt or starting text to generate a response.
Send a request to the API: Use the client library to send a request to the OpenAI API, passing in the required parameters and input data.
Receive a response from the API: The API will respond with the generated text or answer based on the input data and use case.
Use the output: You can use the output generated by ChatGPT in various ways, such as displaying it to a user, storing it in a database, or using it as input for further processing.
That’s a general overview of how to use ChatGPT. Be sure to consult the OpenAI API documentation and client library instructions for more detailed information and examples.
What is ChatGPT 3 vs 4?
GPT-3 and GPT-4 are both language models developed by OpenAI. However, as of my knowledge cutoff in 2021, OpenAI has only released GPT-3, and GPT-4 does not exist yet.
GPT-3, also known as Generative Pretrained Transformer 3, is a state-of-the-art language model that was released in June 2020. It is based on the transformer architecture and was trained on a massive corpus of text data from the internet, making it capable of understanding and generating human-like text.
GPT-3 is one of the largest language models to date, with 175 billion parameters, and has demonstrated impressive results in various natural language processing tasks, including text generation, question answering, language translation, and more.
It is not known what GPT-4 will entail, as OpenAI has not officially announced its development or release. It is possible that GPT-4 will be a continuation of the GPT series, offering improved performance and capabilities, but this is currently speculation.
ChatGPT CheatSheet For Everyone
Dive into the world of ChatGPT, In this comprehensive guide, you’ll learn everything there is to know about this language model developed by OpenAI.You’ll become a ChatGPT expert in no time. So don’t wait any longer – join us on this journey to GPTChat mastery!
Tips and tricks for the ChatGPT interface
Enter text in the “Prompt” field for ChatGPT to respond to Save ChatGPT responses by clicking the “Save” button and access them by clicking the “Saved responses” tab
Group similar tasks or queries under the same saved chat to get better results
Using the “Regenerate Response” feature will not erase previous searches and they can be
accessed by flipping through layers using <3/2>. By rating Chat GPT’s responses and providing feedback, users can help the platform improve and become more accurate over time.If you are ready to start a new chat or task, you can click on “New Chat” to create a fresh chat space. This is especially helpful if you are now working on a different topic.
15 Tips for ChatGPT
1 -ACT LIKE
DEFINITION:
Mimic the communication
style or sales techniques of a
successful competitor.
EXAMPLE:
“ACT LIKE my teacher
reviewing my Essay about
“Why Students should not
use ChatGPT to do Essay”
done in ChatGPT”
2 – INCLUDE
DEFINITION:
Include specific data or
information in an analysis
or report.
EXAMPLE:
“List of Influencers
INCLUDE their social
media URLs”
3 – Display in Columns
DEFINITION:
Present data in a table or
column format for easier
analysis.
EXAMPLE:
“List of Influencers
include their Instagram
URLs DISPLAY IN
COLUMNS”
4 – FIND
DEFINITION:
Search for specific information
or items.
RESULT:
“FIND me a list of
businesses that need to
adopt AI”
5 -Translate
DEFINITION:
Convert text or speech from
one language to another.
EXAMPLE:
“TRANSLATE “ChatGPT has
completely blown my
mind” into mandarin and
explain what blow means
in mandarin”
6 – Define
DEFINITION:
Provide the definition of a
specific term or concept.
DEFINITION:
Change a value or unit of
measurement to another.
EXAMPLE:
“CONVERT the distance of
a trip between london and
edinburgh into kms”
8 – Calculate
DEFINITION:
Perform mathematical
calculations.
EXAMPLE:
“Calculate: x3+y3+z3=k”
9 – Determine Cause
DEFINITION:
Identify the root cause of
a problem or issue.
“Determine cause”
EXAMPLE:
“Determine cause as to
why Boris Johnson won the
elections”
10 – Assess the Impact
DEFINITION:
Evaluate the potential impact
of a decision or action.
EXAMPLE:
“ASSESS the IMPACT of
Redditors on the Price of
the GameStop Stock”
11 – Identify Patterns
DEFINITION:
Recognize patterns or trends
in data or information.
EXAMPLE:
“Identify the patterns in
Netflix’s Recommendations”
12 – Provide Alternatives
DEFINITION:
Present alternative
options or choices.
EXAMPLE:
“PROVIDE ALTERNATIVE
to the above
recommendation”
13 – Explain Concept
DEFINITION:
Provide a detailed
explanation of a concept
or idea.
EXAMPLE:
“EXPLAIN the CONCEPT
of Gravity when on Mars”
14 – Outline steps
DEFINITION:
Provide a step-by-step guide
or process for completing a
task.
EXAMPLE:
“OUTLINE the STEPS
to Grow a Linkedin
Follower base”
15 – Describe the Benefits
DEFINITION:
List the benefits or advantages
of a product or service.
EXAMPLE:
“DESCRIBE BENEFITS of
using podcasts to
continuously learn”
In conclusion, ChatGPT is a powerful language model developed by OpenAI that enables developers to integrate advanced natural language processing capabilities into their applications. The model is trained on massive amounts of text data, making it capable of generating human-like text and performing a variety of tasks, such as text generation, question answering, and language translation.
Access to ChatGPT is provided through the OpenAI API, which requires a developer account, API key, and client library. The output generated by ChatGPT can be used in a variety of ways, depending on the use case, but it is important to evaluate the output carefully and use appropriate techniques such as data validation and error handling.
Overall, ChatGPT represents a major advance in AI technology and has the potential to be a game-changer in the development of AI-powered applications. Whether you are building a chatbot, virtual assistant, or any other application that requires advanced language processing capabilities, ChatGPT is definitely worth considering.
if you want to read our other posts you can check our blog section.
Welcome to the world of Java programming, where efficiency and optimization are key to creating successful applications. One of the most powerful tools in a Java developer’s toolkit is the loop, which allows you to automate repetitive tasks and control the flow of your code. In this blog post, we will explore the different types of Java loops and how to use them to maximize your coding efficiency. Whether you are a beginner or an experienced programmer, you’ll find valuable insights and tips on how to write effective and efficient Java code with loops.
What determines the flow of a program?
The flow of a program is determined by various control structures such as conditional statements, loops, and functions, which determine the order in which the program’s statements are executed. The choices made by these control structures determine the path that the program takes to produce its output.
The three fundamental flows of a program during execution are:
Sequential Flow: In this type of flow, the program runs through a set of statements one after another in a sequential order. This is the simplest type of flow and is often used for simple programs that don’t require any conditional logic.
Conditional Flow: This type of flow allows a program to take different paths based on the outcome of a particular condition. For example, using an “if-else” statement, the program can make a decision to execute a certain set of statements if a condition is true, or another set of statements if the condition is false.
Iterative Flow: This type of flow allows a program to repeat a set of statements multiple times. Loops such as “for” and “while” are commonly used to implement this flow. The program continues to repeat the statements until a specific condition is met. This type of flow is useful for processing large amounts of data, where the same set of statements needs to be executed multiple times.
What are Loops?
Loops are control structures in programming that allow for repeating a set of statements multiple times. They are used for tasks such as processing large amounts of data, where the same operations need to be performed repeatedly, or for generating patterns and sequences. Loops are implemented using constructs such as “for”, “while”, and “do-while”.
In a “for” loop, the number of iterations is predetermined and the loop runs a specific number of times. In a “while” loop, the loop continues to run as long as a certain condition is met. The “do-while” loop is similar to the “while” loop, but it ensures that the loop runs at least once, even if the condition is not met.
Loops play a critical role in making programs more efficient, as they allow developers to automate repetitive tasks, reducing the need for writing out the same code multiple times. They also make it possible to control the flow of a program and make decisions based on certain conditions.
Why loops are used in Java?
Loops are used in Java to execute a set of statements multiple times until a specific condition is met. There are several reasons why loops are useful in Java:
Repetition of statements: Loops allow you to repeat a set of statements multiple times, which is useful when you need to perform the same operation multiple times.
Conditional execution: Loops allow you to execute statements only when a specific condition is met, which is useful when you need to perform an operation only under certain conditions.
Iteration: Loops allow you to iterate over a range of values or an array, which is useful when you need to process each element of an array or perform an operation for a specific number of times.
Automation: Loops allow you to automate repetitive tasks, which saves time and reduces the possibility of making mistakes.
Overall, loops are an essential tool for Java programming as they allow you to control the flow of a program and perform operations multiple times efficiently.
What is the advantage of a loop?
Loops provide several advantages in programming, some of the most important ones are:
Repetition: Loops allow you to repeat a set of statements multiple times, which is useful when you need to perform the same operation multiple times.
Conditional Execution: Loops allow you to execute statements only when a specific condition is met, which is useful when you need to perform an operation only under certain conditions.
Iteration: Loops allow you to iterate over a range of values or an array, which is useful when you need to process each element of an array or perform an operation for a specific number of times.
Automation: Loops allow you to automate repetitive tasks, which saves time and reduces the possibility of making mistakes.
Better Control Flow: Loops allow you to control the flow of a program, making it easier to handle complex tasks and improving the overall efficiency of the program.
Readability: Well-structured loops make the code more readable and easier to understand, especially for complex operations that need to be repeated multiple times.
Overall, loops are a fundamental tool in programming, and their use leads to more efficient and readable code.
What is the disadvantage of loop?
While loops provide several advantages in programming, there are also some disadvantages that should be considered:
Performance: Loops can slow down the performance of a program, especially when the loop performs a large number of iterations or when the loop contains complex operations that take a long time to execute.
Infinite Loops: Loops can run indefinitely if the termination condition is not specified correctly, leading to an infinite loop and potentially causing the program to crash or hang.
Logic Errors: Loops can contain logic errors, such as incorrect termination conditions, incorrect increment/decrement operations, or incorrect loop conditions, which can result in unexpected behavior.
Maintenance: Loops can make the code more difficult to maintain, especially when the logic of the loop is complex or when the loop is used in several different places in the code.
Debugging: Debugging loops can be challenging, especially when the loop contains complex logic or when the loop is part of a large program.
Overall, while loops are a powerful tool in programming, they should be used with caution to ensure the code is efficient, maintainable, and free from errors.
What are the three 3 types of loops in Java?
In Java, there are three main types of loops:
For Loop: A for loop is used to iterate over a range of values or an array. It consists of a loop header that defines the range of values to be processed and a loop body that contains the statements to be executed for each iteration.
While Loop: A while loop is used to execute a block of statements repeatedly until a specific condition is met. The loop header consists of the condition that is evaluated before each iteration, and the loop body contains the statements to be executed.
Do-While Loop: A do-while loop is similar to a while loop, but with one main difference: it is guaranteed to execute at least once, even if the condition is false. In a do-while loop, the loop body is executed first, and then the condition is evaluated. If the condition is true, the loop continues to run.
Each type of loop has its own use cases and advantages, and it’s important to choose the right loop type depending on the requirements of the task at hand.
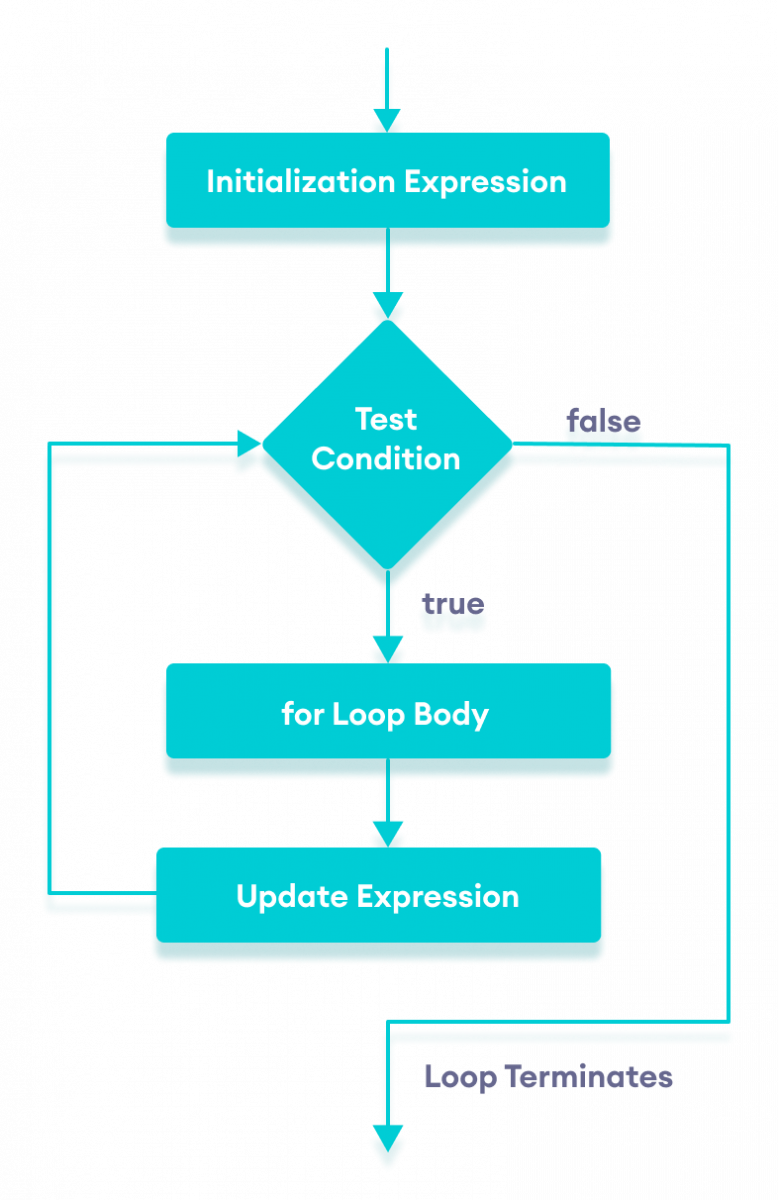
For Loop:
A for loop is a control structure that allows you to repeat a set of statements for a predetermined number of iterations. It is used to iterate over a range of values or an array. The structure of a for loop in Java consists of a loop header and a loop body.
The loop header consists of three parts:
Initialization: This is where you initialize a loop control variable to a starting value.
Condition: This is where you define the condition that must be met in order to continue iterating. The loop stops executing when this condition is no longer met.
Increment/Decrement: This is where you specify how the loop control variable should be modified after each iteration.
The loop body contains the statements that are executed for each iteration.
A for loop in Java can be written as follows:
for (int i = 0; i < 10; i++) {
   // statements to be executed for each iteration
}
In this example, the loop will iterate 10 times, with the loop control variable “i” starting from 0 and increasing by 1 after each iteration. The loop stops executing when the value of “i” reaches 10. The statements inside the loop body will be executed for each iteration.
While Loop:
A while loop is a control structure that allows you to repeat a set of statements as long as a certain condition is met. It is used to execute a block of statements repeatedly until a specific condition is no longer satisfied. The structure of a while loop in Java consists of a looping header and a loop body.
The loop header consists of a condition that is evaluated before each iteration. If the condition is true, the loop body is executed; if the condition is false, the loop terminates and control is transferred to the next statement after the loop.
A while loop in Java can be written as follows:
int i = 0;
while (i < 10) {
   // statements to be executed for each iteration
   i++;
}
In this example, the loop will iterate as long as the value of “i” is less than 10. The statements inside the loop body will be executed for each iteration, and the value of “i” will be incremented by 1 after each iteration. The loop stops executing when the value of “i” reaches 10 and the condition “I < 10” is no longer true.
Do-While Loop:
A do-while loop is a control structure that is similar to a while loop, with one main difference: it is guaranteed to execute at least once, even if the condition is false. It is used to execute a block of statements repeatedly until a specific condition is met. The structure of a do-while loop in Java consists of a loop body and a looping header.
The loop body contains the statements that are executed for each iteration. The loop header consists of a condition that is evaluated after each iteration. If the condition is true, the loop continues to run; if the condition is false, the loop terminates and control is transferred to the next statement after the loop.
A do-while loop in Java can be written as follows:
int i = 0;
do {
   // statements to be executed for each iteration
   i++;
} while (i < 10);
In this example, the loop will iterate as long as the value of “i” is less than 10. The statements inside the loop body will be executed for each iteration, and the value of “i” will be incremented by 1 after each iteration. The loop will run at least once, even if the condition “I < 10” is false, as the loop body is executed before the condition is evaluated. The loop stops executing when the value of “i” reaches 10 and the condition “I < 10” is no longer true.
Which loop is faster in Java?
The performance of loops in Java is dependent on various factors such as the size of the loop, the complexity of the operations performed inside the loop, and the efficiency of the underlying hardware. As a result, it’s difficult to make a general statement about which loop is faster.
That being said, the for loop is often considered faster than the while loop in Java, as it is more optimized for fixed iteration loops where the number of iterations is known in advance. In contrast, the while loop is better suited for situations where the number of iterations is unknown or where the loop condition is evaluated dynamically.
In practice, the difference in performance between the two loops is usually negligible, and the choice of which loop to use is often based on code readability and maintainability rather than performance considerations.
Which loop is most used?
The for loop is the most commonly used loop in Java, as it is well suited for situations where the number of iterations is known in advance or where the loop can be easily expressed using a counter. The for loop provides a clean and concise syntax for defining the starting condition, ending condition, and increment/decrement of the loop counter, making it easy to understand and maintain.
However, the while loop is also commonly used in Java, especially in situations where the number of iterations is not known in advance, or where the loop condition is evaluated dynamically. The while loop is particularly useful when you want to repeat a block of code until a certain condition is met.
In conclusion, the choice of which loop to use depends on the specific requirements of the problem being solved, and both the for and while loops have their own strengths and use cases.
Some Problems and Solutions:
For Loop:
Question: How do you write a for loop to print the numbers from 1 to 10?
Solution:
for (int i = 1; i <= 10; i++) {
   System.out.println(i);
}
While Loop:
Question: How do you write a while loop to print the numbers from 1 to 10?
Solution:
int i = 1;
while (i <= 10) {
   System.out.println(i);
   i++;
}
Do-While Loop:
Question: How do you write a do-while loop to print the numbers from 1 to 10?
Solution:
int i = 1;
do {
   System.out.println(i);
   i++;
} while (i <= 10);
In all three solutions, the loop will iterate from 1 to 10, printing the value of “i” for each iteration. The loop condition is tested at the end of each iteration for the while loop and at the beginning for the do-while loop, and the loop terminates when the value of “i” is greater than 10.
In conclusion, loops are a fundamental tool in programming and provide several advantages, such as repetition, conditional execution, iteration, automation, better control flow, and readability. However, loops also have some disadvantages, such as performance issues, the possibility of creating infinite loops, logic errors, maintenance difficulties, and debugging challenges. To make the best use of loops, it is important to understand their capabilities, limitations, and best practices, and to use them appropriately to ensure efficient, maintainable, and error-free code.
if you want to read our other posts you can check our blog section.
The Android Material Toolbar is a versatile and powerful component that every Android app developer should be familiar with. It offers a clean, modern design and a convenient space for branding, navigation, and user interaction. In this comprehensive guide, you’ll learn everything you need to know about customizing the Material Toolbar to suit the needs of your app and your users. From selecting the right colors and elevations to adding buttons, icons, and a search bar, we’ll cover all the essentials to help you create an engaging and user-friendly app that stands out from the crowd. So, let’s dive in and explore the full potential of the Android Material Toolbar!
What is material Toolbar in Android?
The Android Material Toolbar is a type of toolbar that is part of the Material Design system for Android apps. It is a navigation component that provides a space for branding, navigation, and user interaction, and can include buttons, icons, and a search bar. The Material Toolbar replaces the traditional ActionBar in Android and is typically placed at the top of an app’s screen. The Material Toolbar can be customized with colors, elevation, and other styles to match an app’s visual style, making it a flexible and powerful tool for Android app development.
How to implement a material toolbar in android studio?
Here’s a step-by-step guide on how to implement a Material Toolbar in Android Studio:
Create a new project or open an existing one.
Add the Material Design library to your app-level build.gradle file:
And that’s it! You have now successfully implemented a Material Toolbar in your Android app using Android Studio.
How to customize Material Toolbar?
You can customize the Android Material Toolbar in the following ways:
Change the background color: You can set the background color of the Material Toolbar to match the color scheme of your app using the app:background attribute in your XML layout.
Add a logo or image: You can add a logo or image to the Material Toolbar using the app:logo attribute in your XML layout.
Add buttons and icons: You can add buttons and icons to the Material Toolbar using menu items and the app:showAsAction attribute in your XML menu file.
Add a search bar: You can add a search bar to the Material Toolbar by including a SearchView widget in your XML layout and implementing a searchable configuration in your AndroidManifest.xml file.
Set elevation: You can set the elevation of the Material Toolbar using the app:elevation attribute in your XML layout.
Style text and title: You can style the text and title in the Material Toolbar using the app:titleTextAppearance and app:subtitleTextAppearance attributes in your XML layout.
To make these customizations, you will need to write code in the XML layout file and the Java code file of your app.
Change the background color.
To customize the background color of the Android Material Toolbar, you need to set the app:background attribute in your XML layout. Here’s an example:
In this example, the background color is set using the @color/your_color resource. You can replace your_color with the color you want to use for the background. You can define colors in the res/values/colors.xml file in your project.
For example, to set the background color to red, you can add the following to the colors.xml file:
<color name="your_color">#FF0000</color>
Note that you can also set the background color programmatically in your Java code file. To do this, you can use the setBackgroundColor method on the MaterialToolbar object.
Add a logo or image.
To add a logo or image to the Material Toolbar, you can use the setLogo or setNavigationIcon method in your Java code file.
In this example, your_menu is the name of your menu resource that you want to inflate into the toolbar. The menu resource should be defined in an XML file in the res/menu directory of your project.
In this example, the menu contains two items with icons and titles. The app:showAsAction attribute determines how the items will be displayed in the toolbar. If set to ifRoom, the items will only be shown in the toolbar if there is enough room. If there isn’t enough room, they will be moved to the overflow menu.
You can handle the clicks of these buttons or icons by setting an OnMenuItemClickListener on the MaterialToolbar object. Here’s an example:
To add a search bar to the Material Toolbar, you can use the MenuItem class and inflate a menu resource that contains a search action view. Here’s an example:
Create a menu resource file in res/menu directory:
In this example, the menu resource contains a single item with an id of @+id/action_search and a title of “Search”. The app:actionViewClass attribute specifies the class of the action view to be used, in this case a SearchView. The app:showAsAction attribute specifies that the search action view should be displayed in the toolbar always.
Inflate the menu resource in the onCreateOptionsMenu method:
In this example, the code first checks if the selected item is the search action view, and then finds the SearchView and sets a query hint and an OnQueryTextListener. The listener can be used to handle the text change and submit events.
Set elevation.
To set the elevation of the Material Toolbar, you can use the setElevation method. The elevation value is specified in pixels and represents the distance of the toolbar from the surface. Here’s an example:
In this example, the code first finds the Toolbar by its id, and then sets its elevation to 8 pixels. The value of 8 pixels is just an example, you can use any value that you desire.
Style text and title.
To style the text and title in the Material Toolbar, you can use the setTitle and setTitleTextColor methods. Here’s an example:
In this example, the code first finds the Toolbar by its id, and then sets its title text and title text color. The title text is set to “Your Title” and the title text color is set to white. The values in this example are just examples, you can use any values that you desire.
5 resources to know more about the material toolbar.
VPN (Virtual Private Network) encryption is a method used to secure and protect data and online identity when using the internet. It creates a secure and encrypted connection between the user’s device and a VPN server, allowing for private and secure communication over the internet. This can prevent hackers, governments, and other third parties from intercepting and accessing sensitive information such as credit card numbers, login credentials, and personal information. Additionally, VPN encryption can also be used to bypass internet censorship and access blocked websites.
How does a VPN work?
A VPN works by creating a secure and encrypted connection, known as a “VPN tunnel,” between a device and a VPN server. When a device connects to a VPN server, all of the device’s internet traffic is routed through the VPN tunnel, which encrypts the data to protect it from unauthorized access.
The VPN server then sends the encrypted data to its destination on the internet, such as a website or online service. The destination server receives the encrypted data and sends its response back to the VPN server, which then decrypts the data and sends it back to the device.
This process makes it appear as if the device is located in the location of the VPN server, rather than its actual location, which can be used to bypass geographical restrictions and access blocked websites.
Additionally, because the data sent and received is encrypted, it makes it difficult for hackers, governments and other third parties to intercept and access sensitive information.
What are the benefits of a VPN connection?
There are several benefits to using a VPN connection, including:
Security: VPN encryption protects your data and online identity from unauthorized access, making it a secure way to use the internet.
Privacy: A VPN connection can also help to protect your online privacy by hiding your IP address and location from websites and online services.
Bypassing censorship: A VPN can be used to bypass government censorship and access blocked websites, content, and services.
Anonymous browsing: By masking your IP address, VPNs can help you browse the internet anonymously.
Protection on public Wi-Fi: VPNs encrypt your data when you are connected to public Wi-Fi, making it harder for hackers to intercept your data.
Geographic location spoofing: A VPN allows you to appear as if you are in a different location, which can be useful for accessing geo-blocked content and services.
Remote access: A VPN can also be used to securely access a company’s internal network while working remotely.
Protection for business: VPNs can also protect business data and communication, allowing employees to connect to the company’s network securely from anywhere.
Security :
Security is one of the main benefits of using a VPN connection. A VPN encrypts your internet connection, creating a secure and private “VPN tunnel” between your device and the VPN server. This encryption makes it much more difficult for hackers, governments, and other third parties to intercept and access your data.
With VPN encryption, your sensitive information such as credit card numbers, login credentials, and personal information are protected, even on public Wi-Fi networks. This is particularly useful when using the internet on public Wi-Fi networks in places like coffee shops, airports, and hotels, where it is easy for hackers to intercept your data.
VPN encryption also helps to protect your online identity by hiding your IP address and location from websites and online services. This means that your browsing history and online activities cannot be traced back to you, providing an additional layer of privacy and security.
Additionally, many VPN providers use various protocols to encrypt the data, such as OpenVPN, L2TP, PPTP, and IKEv2, which are considered to be highly secure and are regularly audited by third-party security experts.
Privacy:
Privacy is another major benefit of using a VPN connection.
When you connect to a VPN server, your IP address and location are hidden from websites and online services. This makes it difficult for advertisers, governments, and other third parties to track your online activities and build a profile of your browsing habits.
Additionally, with a VPN, you can browse the internet anonymously, which can be useful for people living in countries with strict internet censorship or surveillance.
A VPN connection also allows you to access websites, content, and services that may be blocked or restricted in your area, by connecting to a VPN server located in a different country. This can be useful for accessing geo-restricted content such as streaming services, and for avoiding government censorship.
Furthermore, many VPN providers have strict no-logging policies, which means that they do not store any information about your browsing history or online activities. This helps to further protect your privacy and ensures that your data is not shared with any third parties.
Bypassing censorship:
Bypassing censorship is one of the key benefits of using a VPN connection.
In many countries, governments censor the internet to control the flow of information, block access to certain websites, and restrict access to certain types of content. This can be done for various reasons such as political, social, or moral.
When you connect to a VPN server, it makes it appear as if you are located in the location of the VPN server, rather than your actual location. This allows you to bypass geographical restrictions and access blocked websites, content, and services. This is particularly useful if you are traveling to a country with strict internet censorship or living in a country where the government blocks certain websites and services.
Additionally, VPNs can also be used to bypass firewalls and other types of internet censorship that are often used in workplaces, schools, and other organizations.
It’s worth noting that some countries have laws that prohibit the use of VPNs, so it’s important to check the laws of the country you’re in before using a VPN service.
Anonymous browsing:
Anonymous browsing is another benefit of using a VPN connection.
When you connect to a VPN, your IP address is hidden from websites and online services. This makes it difficult for advertisers, governments, and other third parties to track your online activities and build a profile of your browsing habits.
An IP address is a unique numerical label assigned to each device connected to a computer network that uses the Internet Protocol for communication. IP addresses can be used to determine the geographic location of a device, and to track the browsing activities of a user. By hiding your IP address, VPNs help you to browse the internet anonymously. This can be useful for people living in countries with strict internet censorship or surveillance.
Additionally, many VPN providers have strict no-logging policies, which means that they do not store any information about your browsing history or online activities. This helps to further protect your anonymity and ensures that your data is not shared with any third parties.
It’s important to note that while VPN can provide a level of anonymity, it’s not completely foolproof and you should be aware of how to protect your anonymity while browsing the internet.
Protection of public Wi-Fi:
The protection on public Wi-Fi is another benefit of using a VPN connection.
Public Wi-Fi networks, such as those found in coffee shops, airports, and hotels, are often unsecured and can be easily accessed by hackers. This makes it easy for hackers to intercept your data, steal your personal information and gain access to your accounts.
When you connect to a VPN, your internet connection is encrypted, creating a secure and private “VPN tunnel” between your device and the VPN server. This encryption makes it much more difficult for hackers to intercept and access your data, even on public Wi-Fi networks.
Additionally, many VPN providers use various protocols to encrypt the data, such as OpenVPN, L2TP, PPTP, and IKEv2, which are considered to be highly secure and are regularly audited by third-party security experts.
It’s important to note that even with a VPN, you should still be careful when using public Wi-Fi networks, as VPNs do not protect against all types of cyber threats such as phishing or malware.
Geographic location spoofing:
Geographic location spoofing is another benefit of using a VPN connection.
When you connect to a VPN server, it makes it appear as if you are located in the location of the VPN server, rather than your actual location. This allows you to bypass geographical restrictions and access blocked websites, content, and services.
This can be useful for accessing geo-restricted content such as streaming services, and for avoiding government censorship. For example, if you are living in a country where certain streaming services are not available, you can connect to a VPN server located in a country where the service is available, and access the content as if you were located there.
Additionally, this feature can be useful for businesses that have to comply with geo-restrictions for certain online services, allowing employees to access the services from different locations.
It’s worth noting that some websites and online services may still be able to detect that you are using a VPN and block access to their content, so it’s important to check the terms of service and usage policies of the websites and services you’re trying to access.
Remote access:
Remote access is another benefit of using a VPN connection.
A VPN can be used to securely access a company’s internal network while working remotely. This allows employees to access company resources, such as files and applications, from anywhere, as if they were connected to the company’s network directly. This can increase the productivity and flexibility for the employees, as well as enabling companies to have a remote workforce.
With a VPN, employees can connect to the company’s network using a secure and encrypted VPN tunnel, which protects the data from unauthorized access. This is particularly useful when employees need to access sensitive data or confidential information.
Additionally, businesses can also use a VPN to connect multiple office locations, creating a virtual private network (VPN) between them. This allows employees at different locations to access the same resources and collaborate seamlessly.
It’s worth noting that companies should properly configure their VPNs and keep them up to date, to ensure that the remote access is secure and that the company’s network is not exposed to any vulnerabilities.
Protection for business:
Protection for business is another benefit of using a VPN connection.
VPNs can be used to protect business data and communication, allowing employees to connect to the company’s network securely from anywhere. This can be particularly useful for businesses that have employees working remotely or from different locations.
With a VPN, employees can connect to the company’s network using a secure and encrypted VPN tunnel, which protects the data from unauthorized access. This is particularly useful when employees need to access sensitive data or confidential information. Additionally, VPNs can also be used to securely access cloud-based applications and services, such as email and storage services.
Businesses can also use VPNs to connect multiple office locations, creating a virtual private network (VPN) between them. This allows employees at different locations to access the same resources and collaborate seamlessly. Additionally, VPNs can be used to connect to business partners or customers securely and can also be used to create secure connections between branch offices and the main office.
It’s worth noting that companies should properly configure their VPNs and keep them up to date, to ensure that the network is secure and that the company’s data is not exposed to any vulnerabilities.
Why should you use a VPN connection?
There are several reasons why you should use a VPN connection:
Security: VPN encryption protects your data and online identity from unauthorized access, making it a secure way to use the internet, particularly on public Wi-Fi networks.
Privacy: A VPN connection can also help to protect your online privacy by hiding your IP address and location from websites and online services, and masking your browsing history.
Bypassing censorship: A VPN can be used to bypass government censorship and access blocked websites, content, and services.
Anonymous browsing: By masking your IP address, VPNs can help you browse the internet anonymously.
Protection on public Wi-Fi: VPNs encrypt your data when you are connected to public Wi-Fi, making it harder for hackers to intercept your data.
Geographic location spoofing: A VPN allows you to appear as if you are in a different location, which can be useful for accessing geoblocked content and services.
Remote access: A VPN can also be used to securely access a company’s internal network while working remotely.
Protection for business: VPNs can also protect business data and communication, allowing employees to connect to the company’s network securely from anywhere.
In summary, a VPN can provide a secure and private way to access the internet, protect your online privacy, and bypass geographical restrictions, making it a valuable tool for anyone who wants to protect their online identity and access the internet freely.
The history of VPNs
The history of VPNs (Virtual Private Networks) can be traced back to the late 1990s, as a solution to the problem of securely connecting remote users to a company’s internal network.
The first VPNs were based on the concept of creating a “tunnel” through the public internet to connect remote users to a company’s internal network. This was done by using the Internet Protocol Security (IPSec) protocol to encrypt the data being transmitted through the tunnel.
In the early 2000s, VPN technology began to evolve as more businesses started to use the internet for communication and commerce. This led to the development of new VPN protocols, such as Point-to-Point Tunneling Protocol (PPTP) and Layer 2 Tunneling Protocol (L2TP), which made it easier to set up and manage VPN connections.
In the 2010s, VPN usage began to expand beyond just businesses, as more and more individuals started to use VPNs for personal use. This was due in part to the rise of mobile devices and the increasing use of public Wi-Fi networks, which made it more important for individuals to protect their data and online identity.
Today, VPNs have become a popular tool for protecting privacy and bypassing internet censorship, with a wide range of VPN services available for both personal and business use. The industry continues to evolve, with new protocols and features being developed to address the growing demand for better security and privacy.
The predecessors of the VPN
The concept of securely connecting remote users to a company’s internal network predates the development of VPNs (Virtual Private Networks). Some of the predecessors of VPNs include:
Leased Lines: Leased lines were private, dedicated telephone lines that were used to connect two or more remote locations. This allowed companies to securely transfer data between locations and was commonly used to connect branch offices to the main office.
Frame Relay: Frame relay was a data link layer protocol that was used to connect remote locations over a wide area network (WAN). It allowed companies to establish a dedicated virtual circuit between locations, which provided a secure and efficient way to transfer data.
Dial-up Remote Access: Dial-up remote access was a method of connecting remote users to a company’s internal network using a telephone line and a modem. This allowed employees to access the company’s network from home or while travelling, but the connection was not always secure and could be vulnerable to hacking.
These technologies were the main way to connect remote users to a company’s internal network before the development of VPNs, but they were not as flexible, secure and efficient as VPNs. With VPNs, companies and individuals can securely connect to a private network over the public internet, which provide more flexibility, security and scalability.
Early VPNs
Early VPNs (Virtual Private Networks) were based on the concept of creating a “tunnel” through the public internet to connect remote users to a company’s internal network. The first generation of VPNs used the Internet Protocol Security (IPSec) protocol to encrypt the data being transmitted through the tunnel. These early VPNs were primarily used by businesses to securely connect remote employees to their internal networks and to connect multiple office locations.
The first commercial VPN was offered by the company called “Cisco Systems”, in 1996. Cisco’s VPN solution was based on IPSec and was designed to provide secure remote access for employees. The solution was initially intended for use with Cisco’s own routers but later was made available for third-party routers.
Another early VPN solution was offered by the company “Microsoft”, in 1999. Microsoft’s VPN solution was called “PPTP” (Point-to-Point Tunneling Protocol) and it was included as a feature in Windows 2000. PPTP made it easy for small businesses to set up and manage VPN connections.
These early VPNs were not as feature-rich as today’s VPNs, but they served as the foundation for the development of more advanced VPN technologies. With the development of new protocols, such as L2TP, OpenVPN, and IKEv2, VPNs have become more secure and easier to use.
VPNs and their current use
Today, VPNs (Virtual Private Networks) have become a popular tool for both personal and business use. They are widely used for protecting privacy and bypassing internet censorship, as well as for securely connecting to a private network over the public internet.
For personal use, VPNs are mainly used to protect privacy and security while browsing the internet. By encrypting internet connection, VPNs protect users from hackers, governments, and other third parties who might intercept and access their personal data. Additionally, VPNs can also be used to bypass geographical restrictions, allowing users to access blocked websites and services.
For business use, VPNs are mainly used to securely connect remote employees to a company’s internal network, connecting multiple office locations, and connecting to business partners or customers securely. This allows employees to access company resources, such as files and applications, from anywhere, as if they were connected to the company’s network directly.
Additionally, VPNs are also used by organizations to comply with regulatory compliance standards, such as HIPAA, PCI-DSS, and SOC2, and to protect data in transit and at rest.
The VPN industry continues to evolve, with new protocols, features and services being developed to address the growing demand for better security, privacy and compliance.
How to surf securely with a VPN
To surf securely with a VPN, you can follow these steps:
Choose a reputable VPN provider: Research and choose a reputable VPN provider that offers a high level of security and privacy.
Download and install the VPN software: Download and install the VPN software provided by your chosen provider on your device.
Connect to a VPN server: Open the VPN software and connect to a VPN server.
Check for a secure connection: Make sure that your connection is secure by checking for a padlock icon or “Secure” label in the browser’s address bar.
Configure your settings: Configure your VPN settings to your preferences, such as selecting the protocol you want to use, and enabling the kill switch feature.
Start browsing: Once you are connected to a VPN server, you can start browsing the internet securely.
Disconnect from the VPN server: When you are finished browsing, make sure to disconnect from the VPN server to ensure that your internet connection is not accidentally left open.
It’s important to note that not all VPNs are created equal, some VPNs may not encrypt your data properly or may keep logs of your browsing activities, so it’s important to choose a reputable VPN provider and to read the VPN’s privacy policy before using it.
What kind of VPNs are there?
There are several types of VPNs (Virtual Private Networks) available, each with its own unique set of features and capabilities. Some of the most common types of VPNs include:
Remote Access VPNs: These VPNs are used to connect remote users to a company’s internal network. They allow employees to access company resources, such as files and applications, from anywhere, as if they were connected to the company’s network directly.
Site-to-Site VPNs: These VPNs are used to connect multiple office locations, creating a virtual private network (VPN) between them. This allows employees at different locations to access the same resources and collaborate seamlessly.
Consumer VPNs: These VPNs are designed for personal use and typically offer a range of features such as encryption, location spoofing, and the ability to access blocked websites and services.
Mobile VPNs: These VPNs are designed for use on mobile devices and offer additional features such as automatic connection when using public Wi-Fi, and the ability to switch between VPN servers.
Cloud VPNs: These VPNs are built to connect users to cloud-based services and applications, they are typically used by businesses that have a large portion of their infrastructure hosted on the cloud.
Browser VPNs: These VPNs provide a browser extension that encrypts your browser’s traffic. This can be useful for users who only want to encrypt their browser traffic, rather than their whole device.
Double VPN: This type of VPN encrypts your internet connection twice, adding an extra layer of security to your connection.
It’s important to note that while VPNs can be used to protect your privacy and security, they are not all created equal, so it’s important to choose a reputable VPN provider and read its privacy policy before using it.
How do I install a VPN on my computer?
Installing a VPN (Virtual Private Network) on your computer is a straightforward process that typically involves the following steps:
Choose a reputable VPN provider: Research and choose a reputable VPN provider that offers a high level of security and privacy.
Create an account: Sign up for an account with your chosen VPN provider.
Download the VPN software: Download the VPN software provided by your chosen provider on your computer.
Install the software: Once the download is complete, open the installation file and follow the prompts to install the VPN software on your computer.
Log in: Open the VPN software and log in with the account you created.
Connect to a VPN server: Select a VPN server from the list of available servers, and click the “Connect” button to establish a connection.
Verify the connection: Once connected, the VPN software will usually show a notification or an icon in the system tray indicating that the connection is active.
Configure your settings: Configure your VPN settings to your preferences, such as selecting the protocol you want to use, and enabling the kill switch feature.
It’s worth noting that the steps may vary slightly depending on the VPN provider you choose and the operating system of your computer. Also, it’s recommended to check the compatibility of your computer with the VPN software before installing it.
How to install a VPN connection on your smartphone
Installing a VPN (Virtual Private Network) on your mobile phone is a straightforward process that typically involves the following steps:
Choose a reputable VPN provider: Research and choose a reputable VPN provider that offers a high level of security and privacy.
Create an account: Sign up for an account with your chosen VPN provider, if you haven’t done so already.
Download the VPN app: Download the VPN app provided by your chosen provider from the App Store or Google Play.
Install the app: Once the download is complete, open the app and follow the prompts to install it on your mobile phone.
Log in: Open the VPN app and log in with the account you created.
Connect to a VPN server: Select a VPN server from the list of available servers, and tap the “Connect” button to establish a connection.
Verify the connection: Once connected, the VPN app will usually show a notification or an icon in the status bar indicating that the connection is active.
Configure your settings: Configure your VPN settings to your preferences, such as selecting the protocol you want to use, and enabling the kill switch feature.
It’s worth noting that the steps may vary slightly depending on the VPN provider you choose and the operating system of your mobile phone. Also, it’s recommended to check the compatibility of your mobile phone with the VPN software before installing it.
Conclusion
In conclusion, a VPN (Virtual Private Network) is a valuable tool for anyone who wants to protect their online identity and access the internet freely. It encrypts your internet connection and protects your data and online identity from unauthorized access, making it a secure way to use the internet, particularly on public Wi-Fi networks. Additionally, VPNs can also help to protect your online privacy by hiding your IP address and location from websites and online services, and masking your browsing history. Also, VPNs can be used to bypass government censorship and access blocked websites, content, and services. There are several types of VPNs available, each with its own unique set of features and capabilities, and the installation process is easy to do on both computers and mobile phones. However, it’s important to choose a reputable VPN provider and read its privacy policy before using it.
developing mobile applications, or apps is a rapidly growing field with endless possibilities. With the widespread use of smartphones and tablets, mobile apps have become an integral part of daily life for many people. There are various types of apps available, such as gaming apps, social media apps, productivity apps, and many more. The process of creating an app begins with an idea, followed by the development of the app using programming languages such as Java and Swift. The app is then tested and refined before it is released to the public through app stores such as the Apple App Store and Google Play Store.
The app market is highly competitive, with thousands of apps being developed and released every day. Therefore, it’s important to have a unique and well-thought-out idea, as well as a user-friendly design and good marketing strategy to make your app stand out from the crowd. With the right idea and execution, a mobile app can become a successful business venture, with the potential to generate significant revenue through in-app purchases, subscriptions, and advertising.
Overall, the field of mobile app development is a fascinating and challenging one that offers endless possibilities for innovation and creativity. It’s also a field that continues to evolve with the rapid advancement of technology, making it an exciting and dynamic industry to be a part of.
Here are 10 best app ideas that haven’t been built yet :
App Idea
Description
Virtual Closet
An app that allows users to upload pictures of their clothing and create a virtual wardrobe, complete with outfit suggestions and a calendar to plan outfits in advance.
Language Exchange
An app that connects users who want to learn a new language with native speakers for language practice and conversation.
Eco-Friendly Product Finder
An app that helps users find and purchase environmentally friendly products, including information on the sustainability practices of different companies.
Personal Finance Planner
An app that helps users create and stick to a budget, track expenses, and set financial goals.
Mindfulness Journal
An app that prompts users to reflect on their day set intentions, and practice gratitude, with guided meditations and journal prompts.
Job Interview Prep
An app that provides users with resources and practice questions to prepare for job interviews, including information on common interview questions and tips on how to answer them.
Social Media Cleanup
An app that helps users clean up their social media accounts by identifying and removing inactive or redundant friends and followers.
Food Allergy and Sensitivity Tracker
An app that allows users to track and manage their food allergies and sensitivities, providing suggestions for safe and tasty alternatives.
Virtual Travel Planner
An app that allows users to plan and book virtual tours and activities, and explore destinations through 360-degree videos and VR experiences.
Pet Care Organizer
An app that helps pet owners keep track of their pet’s medical history, appointments, feeding schedule, and other important information.
Keep in mind that this list is just an example, there are many more app ideas out there that haven’t been built yet. It also depends on the area you focus on, the target audience, and the current market.
Virtual Closet
A virtual closet app is a mobile application that allows users to upload pictures of their clothing and create a virtual wardrobe. This app can be used to organize and keep track of the clothes a user has in their physical wardrobe, as well as provide outfit suggestions and a calendar to plan outfits in advance.
The app would likely have a user-friendly interface that allows users to take pictures of their clothes, tag them with information such as brand, color, and occasion, and then add them to the virtual wardrobe. Users can also create different outfits by selecting clothes from their virtual wardrobe, and saving them for future reference. The app can also have a feature that suggests outfits based on weather, events, or other user-specified criteria.
Users can also plan their outfits in advance with a calendar feature where they can schedule upcoming events and plan their outfits accordingly. The app could also include a shopping list feature where users can create a list of clothes they need to buy.
Overall, a virtual closet app is a great tool for people who want to be more organized and efficient with their wardrobe, as well as for people who want to be more creative with their outfits. It’s also a great app for people who want to keep track of their clothes for inventory and budgeting purposes.
Language Exchange
A language exchange app is a mobile application that connects users from different parts of the world who want to learn a new language. The app allows users to find and connect with native speakers of the language they want to learn, and to practice speaking and understanding the language in real-time conversations.
Users can create a profile on the app, specifying which languages they speak and which languages they want to learn. The app would then match users with native speakers of the languages they want to learn. Users can communicate with their language partners through a chat or video call feature within the app.
The app could also have a feature that allows users to schedule regular conversation sessions with their language partners and a feature that tracks and records the user’s progress. It could also include a variety of language learning resources such as grammar lessons, quizzes, and flashcards to supplement the conversation practice.
The app could also have a social aspect, where users can connect with other language learners, form study groups, and share tips and advice.
Language exchange apps are beneficial for people who want to learn a new language in an interactive and authentic way. It can also help users improve their communication skills, increase their cultural awareness and expand their social network. With the help of a native speaker, it can also help users to learn colloquial phrases, idioms, and accents which can’t be learned from books or classes.
Eco-Friendly Product Finder
An Eco-Friendly Product Finder app is a mobile application that helps users find and purchase environmentally-friendly products. The app allows users to search for products based on different criteria such as product category, brand, and eco-friendly certifications.
Users can create a profile on the app and specify their preferences for eco-friendly products, such as using products made with sustainable materials, products that are cruelty-free and vegan, or products with minimal packaging. The app would then use this information to suggest products that meet the user’s criteria.
The app could also have a feature that allows users to scan barcodes of products in-store and find out if they are eco-friendly and where they can purchase them.
The app could also include a directory of eco-friendly brands and stores, as well as information on how to recycle and dispose of products properly.
Overall, an Eco-Friendly Product Finder app is a great tool for people who want to make more environmentally-friendly choices in their daily lives, but don’t have the time or resources to research products on their own. It can help users to find products that align with their values and help them to reduce their environmental impact. It also helps to promote and support eco-friendly businesses and products.
Personal Finance Planner
A Personal Finance Planner app is a mobile application that helps users manage their finances and create a budget. The app allows users to track their income and expenses, set financial goals, and create a personalized budget plan.
Users can create a profile on the app and input their income and expenses, including recurring payments such as rent, utilities, and subscriptions. The app would then provide users with a clear overview of their financial situation, including how much money they have available to spend each month.
The app could also have a feature that allows users to set financial goals, such as saving for a down payment on a house or paying off credit card debt. Users can then create a budget plan to help them reach their goals, which could include allocating a certain amount of money to savings each month or cutting back on non-essential expenses.
The app could also include a feature that allows users to track their investments, such as stocks and mutual funds, and provides them with information on how to diversify their portfolio.
Overall, a Personal Finance Planner app is a great tool for people who want to take control of their finances and create a budget that works for them. It can help users to create a plan to reach their financial goals, and monitor their spending and saving habits, to make sure that they are staying on track. The app can also help users to make better financial decisions by providing them with the information they need to make informed choices about their money.
Mindfulness Journal
A Mindfulness Journal app is a mobile application that allows users to track their mental and emotional well-being by journaling about their thoughts, feelings, and experiences. The app provides users with prompts and exercises to encourage mindfulness and self-reflection, helping them to stay present and aware of their thoughts and emotions.
Users can create a profile on the app and input their daily thoughts and feelings, as well as rate their level of stress, happiness, and overall well-being. The app would then provide users with a clear overview of their mental and emotional well-being over time, allowing them to identify patterns and triggers that may be affecting their mood.
The app could also have a feature that allows users to set personal goals, such as reducing stress or increasing self-awareness, and provides them with exercises and prompts to help them achieve these goals. The app could also include guided meditations, calming music, and other mindfulness tools to help users relax and focus.
The app could also include a feature that allows users to share their journal entries with a therapist or counselor, if desired, for additional support and guidance.
Overall, a Mindfulness Journal app is a great tool for people who want to improve their mental and emotional well-being by tracking their thoughts and emotions, setting goals, and practicing mindfulness. It can help users to develop self-awareness and gain insight into their thoughts and emotions, leading to greater emotional regulation and well-being. It can also help them to develop self-care and stress management techniques to improve their overall well-being.
Job Interview Prep
A Job Interview Prep app is a mobile application designed to help job seekers prepare for their interviews by providing them with information on common interview questions, tips on how to answer them, and advice on how to make a good impression.
The app would have a database of commonly asked interview questions, with sample answers and tips on how to answer them effectively. Users can also input information about the job they’re applying for and the company, and the app would give them tailored advice on how to prepare for the interview.
Additionally, the app could include a feature that allows users to practice their answers through mock interviews. Users can record themselves answering interview questions, and the app would provide feedback on their delivery, body language, and overall performance.
The app could also have a feature that allows users to research the company they’re interviewing with, providing them with information on the company’s culture, values, and mission, as well as recent news and developments.
The app could also have a feature that allows users to create a personal interview portfolio, where they can save their resume, cover letter, references, and other important documents for easy access during the interview process.
Overall, a Job Interview Prep app is a valuable resource for job seekers looking to improve their interview skills and increase their chances of getting the job. It can help users to be better prepared and confident during the interview process, making a strong impression and ultimately increasing their chances of getting the job.
Social Media Cleanup
A Social Media Cleanup app is a mobile application designed to help users manage and clean up their social media presence. The app would allow users to analyze their social media accounts and identify any potentially negative or embarrassing posts, photos, or comments that could harm their personal or professional reputation.
The app would have a feature that scans the user’s social media accounts and flags any content that could be considered inappropriate, offensive, or unprofessional. Users can then review the flagged content and decide whether to delete it, edit it, or keep it.
The app could also have a feature that allows users to set privacy settings and control who can see their posts and personal information. Users could also schedule posts in advance, allowing them to better manage their social media presence and avoid posting impulsively or inopportunely.
Additionally, the app could provide users with tips and advice on how to present themselves professionally on social media, and how to use social media to improve their personal and professional reputation.
The app could also include a feature that allows users to monitor mentions of their name across social media platforms, and alert them to any negative comments or reviews.
Overall, a Social Media Cleanup app is a useful tool for individuals and professionals who want to manage and maintain a positive online presence. It allows users to take control of their social media accounts, identify and remove potentially damaging content, and present themselves professionally to potential employers and clients.
Food Allergy and Sensitivity Tracker
A Food Allergy and Sensitivity Tracker app is a mobile application designed to help individuals with food allergies and sensitivities keep track of their dietary restrictions and manage their symptoms. The app would allow users to input information about their allergies and sensitivities, and then provide them with a personalized list of foods to avoid and foods that are safe to eat.
The app would have a database of different foods and their ingredients, which users can search through to check for any potential allergens or sensitivities. Users can also input their own recipes and ingredients, and the app would flag any potential allergens or sensitivities.
The app would also have a feature that allows users to track their symptoms after eating certain foods, and then provide them with a report that can be shared with their doctor or allergist.
Additionally, the app could include a feature that allows users to scan barcodes or QR codes of packaged foods to quickly check for allergens or sensitivities.
The app could also include a feature that allows users to find restaurants and grocery stores that cater to specific dietary needs. Users could search for restaurants and stores that offer gluten-free, nut-free, or other allergen-free options.
Overall, a Food Allergy and Sensitivity Tracker app is a valuable tool for individuals with food allergies and sensitivities to manage their dietary restrictions and symptoms. It can help users to make informed decisions about what to eat, and make it easier for them to find safe and appropriate food options, which can improve their quality of life.
Virtual Travel Planner
A Virtual Travel Planner app is a mobile application that helps individuals plan and organize their travel itineraries. The app would allow users to input information about their destination, travel dates, and budget, and then provide them with a personalized list of travel options and recommendations.
The app would have a feature that allows users to search for flights, hotels, and rental cars, and compare prices and options from multiple providers. Users can also input any preferences they have for flights, such as preferred airlines or cabin class, and the app would show them the best options available.
The app would also include a feature that allows users to create a custom itinerary for their trip, including sightseeing, activities and events. Users can also input any specific interests or preferences they have for their trip, such as outdoor activities or cultural experiences, and the app would provide them with tailored recommendations.
Additionally, the app could include a feature that allows users to save and organize their travel documents such as passport, visa, tickets, and travel insurance.
The app could also include a feature that allows users to share their trip with friends and family, so they can see the user’s itinerary and plans, and offer suggestions.
Overall, a Virtual Travel Planner app is a useful tool for individuals who want to plan and organize their travel itineraries. It allows users to easily find and compare travel options, create customized itineraries, and stay organized with all their travel documents. It helps them to make the most of their trip, by providing them with tailored recommendations and personalized tips, which can make their trip more enjoyable and memorable.
Pet Care Organizer
A Pet Care Organizer app is a mobile application that helps pet owners keep track of their pet’s health and well-being. The app would allow users to input information about their pet, such as breed, age, and medical history, and then provide them with a personalized list of care instructions and recommendations.
The app would have a feature that allows users to schedule and track vaccinations, vet appointments, and other medical appointments. Users can also input any medications or supplements their pet is taking, and the app would remind them when to administer them.
The app would also include a feature that allows users to keep track of their pet’s food and water intake, as well as their weight, and provide them with personalized feeding recommendations. Users can also input any dietary restrictions or allergies their pet may have, and the app would provide them with appropriate food options.
Additionally, the app could include a feature that allows users to schedule and keep track of grooming appointments, such as haircuts and nail trims.
The app could also include a feature that allows users to share their pet’s information with other family members or pet sitters, so they can stay informed about their pet’s care.
Overall, a Pet Care Organizer app is a valuable tool for pet owners to keep track of their pet’s health and well-being. It allows users to easily schedule and track appointments, monitor their pet’s food and water intake, and stay informed about their pet’s grooming schedule. It helps pet owners to provide the best care for their pet, and ensure that their pet stays happy and healthy.
In conclusion, the above information highlights a variety of app ideas that have not been built yet, ranging from a Language Exchange app, Eco-Friendly Product Finder, Personal Finance Planner, Mindfulness Journal, Job Interview Prep, Social Media Cleanup, Food Allergy and Sensitivity Tracker, Virtual Travel Planner and Pet Care Organizer. Each app idea addresses a specific need or problem and provides a unique solution for its users. These app ideas have the potential to improve the daily lives of their users by making certain tasks and activities more convenient, efficient and organized.
if you want to read our other posts you can check our blog section.
Java exceptions are an integral part of any Android app development. They are used to handle errors and exceptional scenarios that may arise during the execution of an app. However, mastering the handling of Java exceptions in Android development can be a challenging task for developers. This is because understanding and resolving exceptions requires a deep understanding of the underlying Java language, as well as the Android operating system.
In this guide, we will take a closer look at the basics of Java exceptions and how they are used in Android development. We will cover common exception types, such as runtime exceptions and checked exceptions, and explain how to handle them effectively in your Android app. Additionally, we will provide tips and tricks for debugging and troubleshooting Java exceptions in Android, as well as strategies for building robust and stable apps.
Whether you are an experienced Android developer or just starting out, this guide will help you master the handling of Java exceptions in Android development and build better, more stable apps.
basics of Java exceptions
Java exceptions are events that occur during the execution of a program that disrupts the normal flow of instructions. These events are called “exceptions” because they are exceptional occurrences that are not expected to happen during normal program execution. When an exception occurs, it is handled by the Java runtime system, which then generates an exception object. This object contains information about the exception, such as its type, message, and stack trace.
There are two main types of exceptions in Java: checked exceptions and runtime exceptions.
Checked exceptions are exceptions that are checked by the compiler at compile-time. These exceptions must be either caught or declared by the method that throws them. For example, IOException, SQLException are checked exceptions.
Runtime exceptions, on the other hand, are not checked by the compiler. These exceptions occur during the execution of a program and are typically caused by programming errors, such as null pointer exceptions or array index out of bounds exceptions. These exceptions extend the RuntimeException class and are not required to be caught or declared by the method that throws them.
Java also provides a mechanism for creating your own custom exception classes by extending the Exception or RuntimeException classes. This allows you to create exceptions that are specific to your application and provide more meaningful error messages to the user.
In addition to these basic types of exceptions, Java also includes a number of built-in exceptions for specific types of errors. These include exceptions for errors such as illegal argument exceptions, number format exceptions, and class not found exceptions.
Overall, understanding and effectively handling exceptions is an important aspect of Java programming, and it is crucial for building robust and stable applications.
Here’s an example of how you might use a try-catch block to handle a checked exception in Java:
try {
    FileInputStream file = new FileInputStream("file.txt");
    // some code that might throw an IOException
} catch (IOException e) {
    // handle the exception here
    System.out.println("An error occurred while reading the file: " + e.getMessage());
}
In this example, the try block contains the code that might throw an IOException (in this case, opening a file for reading). The catch block catches the exception and prints an error message to the console.
Here’s an example of how you might handle a runtime exception:
int[] arr = new int[5];
try {
    int x = arr[10];
    // some code that might throw an ArrayIndexOutOfBoundsException
} catch (ArrayIndexOutOfBoundsException e) {
    // handle the exception here
    System.out.println("An error occurred while accessing the array: " + e.getMessage());
}
In this example, the try block contains the code that might throw an ArrayIndexOutOfBoundsException (in this case, trying to access an element of the array that is out of bounds). The catch block catches the exception and prints an error message to the console.
It’s also important to note that you can use multiple catch blocks for different types of exceptions that the try block can throw. And also you can use finally block which will execute after the try block and catch block executed whether exception occur or not.
try {
    // some code that might throw an exception
} catch (IOException e) {
    // handle IOException here
} catch (SQLException e) {
    // handle SQLException here
} finally {
    // code that will execute whether exception occurred or not
}
It’s always a good practice to use try-catch block to handle the exception so that it will not bring the whole program down and also can give the user a meaningful message about the error.
common exception types –
In Java, there are several common exception types that developers may encounter while building an application. Some of these include:
NullPointerException: This exception is thrown when an application attempts to use a null reference in a case where an object is required. This can occur when a variable is not initialized or when a null value is passed as a parameter to a method that expects a non-null value.
ArrayIndexOutOfBoundsException: This exception is thrown when an application attempts to access an array index that is outside the bounds of the array. This can occur when a negative index is used, or when an index that is greater than or equal to the length of the array is used.
IllegalArgumentException: This exception is thrown when a method is passed an illegal or inappropriate argument. This can occur when an argument is out of range, or when an argument is of the wrong type.
NumberFormatException: This exception is thrown when a string is passed to a method that expects a numeric value, but the string cannot be parsed as a number.
ClassNotFoundException: This exception is thrown when an application attempts to load a class that does not exist. This can occur when a class name is misspelled, or when a class is not on the classpath.
IOException: This exception is thrown when an application encounters an error while performing input/output operations such as reading or writing to a file.
SQLException: This exception is thrown when an application encounters an error while interacting with a database using JDBC (Java Database Connectivity).
IllegalStateException: This exception is thrown when a method is called on an object whose current state doesn’t allow it. For example, when trying to add elements to an already closed container.
These are just a few examples of the many types of exceptions that can occur in a Java application. It’s important to understand the different types of exceptions that can occur and how to handle them effectively in order to build robust and stable applications.
How to handle exceptions in Android Studio?
In Android Studio, handling exceptions is similar to handling exceptions in Java.
One way to handle exceptions in Android Studio is by using try-catch blocks. The try block contains the code that might throw an exception, and the catch block catches and handles the exception. For example:
try {
    // some code that might throw an exception
} catch (IOException e) {
    // handle the exception here
    Log.e("MyApp", "An error occurred while reading the file: " + e.getMessage());
}
Another way is to use the throws keyword in the method signature to indicate that the method may throw a checked exception. This means that the method that calls this method must either handle the exception or also declare that it throws the same exception.
public void readFile() throws IOException {
    FileInputStream file = new FileInputStream("file.txt");
    // some code that might throw an IOException
}
Additionally, it’s also possible to use the try-with-resources statement in Android Studio which automatically closes the resources that were opened in the try block, like file, socket, etc.
try (FileInputStream file = new FileInputStream("file.txt")) {
    // some code that might throw an IOException
} catch (IOException e) {
    // handle the exception here
    Log.e("MyApp", "An error occurred while reading the file: " + e.getMessage());
}
It’s important to note that, in Android, it’s also a good practice to use the Android logging system (Log class) to log the exceptions for debugging purposes, as shown in the examples above.
It’s also important to consider the user experience when handling exceptions in Android. Instead of just showing a generic error message, it’s better to show a user-friendly message that gives the user an indication of what went wrong and what they can do about it.
In summary, handling exceptions in Android Studio can be done using try-catch blocks, the throws keyword or the try-with-resources statement, it’s important to also consider the user experience, and also use the Android logging system (Log class) to log the exceptions for debugging purposes.
How to add exception in Android Studio?
In Android Studio, you can add an exception by either throwing a new exception or by catching an existing exception.
To throw a new exception, you can use the throw keyword followed by a new exception object. For example, to throw a new IllegalArgumentException with a message, you can use the following code:
if (someCondition) {
    throw new IllegalArgumentException("Invalid argument");
}
You can also use the throws keyword in the method signature to indicate that the method may throw a checked exception. For example:
public void myMethod() throws IOException {
    // some code that might throw an IOException
}
To catch an existing exception, you can use a try-catch block. The try block contains the code that might throw an exception, and the catch block catches and handles the exception. For example:
try {
    // some code that might throw an exception
} catch (IOException e) {
    // handle the exception here
    Log.e("MyApp", "An error occurred while reading the file: " + e.getMessage());
}
You can also use multiple catch block for different types of exceptions that the try block can throw.
try {
    // some code that might throw an exception
} catch (IOException e) {
    // handle IOException here
} catch (SQLException e) {
    // handle SQLException here
}
It’s important to note that, in Android, it’s also a good practice to use the Android logging system (Log class) to log the exceptions for debugging purposes, as shown in the examples above.
You can also use the try-with-resources statement in Android Studio which automatically closes the resources that were opened in the try block, like file, socket, etc.
try (FileInputStream file = new FileInputStream("file.txt")) {
    // some code that might throw an IOException
} catch (IOException e) {
    // handle the exception here
    Log.e("MyApp", "An error occurred while reading the file: " + e.getMessage());
}
In summary, you can add an exception in Android Studio by using the throw keyword to throw a new exception or by using the try-catch block to catch an existing exception. It’s also a good practice to use the Android logging system (Log class) to log the exceptions for debugging purposes and use the try-with-resources statement for automatically closing the resources.
What is Logcat in Android Studio?
Logcat is a built-in tool in Android Studio that allows developers to view and filter log messages generated by the Android system and their applications. Logcat is an extremely useful tool for debugging and troubleshooting issues in Android applications.
When an Android application is running, it generates a large amount of log data that includes information about system events, such as when an activity is created or destroyed, as well as log messages generated by the application itself. Logcat allows developers to view and filter this log data in real-time, making it easier to identify and fix issues.
You can access Logcat by going to the “Logcat” tab in the Android Monitor window in Android Studio. The Logcat view displays the log data in a scrolling list, with the most recent messages at the top. The log data can be filtered by process, log level, and log tag. It also allows you to search for specific keywords or phrases and filter the logs by the package name of your application.
Logcat also allows you to save log data to a file, so you can analyze it later or share it with others for debugging purposes.
By default, Logcat displays log messages from all processes running on the device or emulator, including system and application processes. The log level can be used to filter logs based on the severity level, like error, warning, info and verbose. The log tag can be used to filter logs based on the tag name, like the package name of the class.
In summary, Logcat is a powerful built-in tool in Android Studio that allows developers to view and filter log messages generated by the Android system and their applications, it’s an essential tool for debugging and troubleshooting issues in Android applications.
Relation between “Logcat” and “exception” in the android studio –
In Android Studio, Logcat and exceptions are related in that Logcat is often used to view and troubleshoot exceptions that occur in an Android application.
When an exception occurs in an Android application, the Android system generates an exception object that contains information about the exception, such as its type, message, and stack trace. The system also generates log messages that include this exception information, which can be viewed and filtered in Logcat.
For example, when a NullPointerException occurs in an application, Logcat will display a log message with the exception type, message, and stack trace, which can be used to identify the source of the exception and help in debugging the issue.
Additionally, when the developer uses the Android logging system (Log class) to log the exceptions, these log messages are also sent to Logcat, which makes it even easier to view and troubleshoot exceptions that occur in the application.
In summary, Logcat is often used to view and troubleshoot exceptions that occur in an Android application by showing the exception information, including the type, message, and stack trace, which is generated by the system or by the developer using the Android logging system (Log class) to log the exceptions.
Custom exception
what is a custom exception?
A custom exception is a user-defined exception class that is created by a developer to handle specific errors or exceptional scenarios that may occur in a program. In other words, it is an exception class that is created by the developer, rather than being provided by the Java standard library or the Android SDK.
A custom exception class is typically created by extending the Exception or RuntimeException class and can include additional constructors or methods specific to the exception. This allows the developer to provide more meaningful error messages to the user, and also to handle the exception in a specific way.
Custom exception classes can be used to handle specific cases in the code and help in providing more accurate error message to the user. For example, if there is a requirement to check if the user entered the correct format of date, in that case, developer can create a custom exception “InvalidDateFormatException” and throws it when the date format is invalid.
It’s important to note that, while creating custom exceptions can be useful in certain situations, it’s important to use them judiciously and only when necessary. In general, it’s best to use the built-in exception classes provided by Java and the Android SDK whenever possible, as they are well-tested and widely understood.
why do we need to create custom exception in java?
There are several reasons why developers may choose to create custom exceptions in Java:
To provide more meaningful error messages: Custom exceptions allow developers to provide more specific and meaningful error messages to the user, which can make it easier to understand and fix issues that occur in the application.
To handle specific scenarios: Custom exceptions allow developers to handle specific scenarios that may occur in the application, such as when a user enters an invalid date format, a custom exception can be thrown to indicate that the date format is invalid.
To handle errors in a specific way: Custom exceptions allow developers to handle errors in a specific way by providing custom exception classes that can be caught and handled by the appropriate code, rather than relying on a generic exception.
To ensure consistency: By creating custom exceptions, developers can ensure consistency in the way errors are handled and reported throughout the application.
To provide a clear separation of concerns: Custom exceptions can help separate the concerns of different parts of the application, by providing a clear mechanism for different parts of the code to indicate and handle specific errors.
To make debugging and troubleshooting easier: Custom exceptions can make it easier to troubleshoot and fix issues in an application by providing more specific information about the error that occurred.
It’s important to note that while creating custom exceptions can be useful in certain situations, it’s important to use them judiciously and only when necessary. Custom exceptions should be used only when the built-in exception classes provided by Java are not suitable for the specific error that occurred. And also, it’s a best practice to provide meaningful and accurate error message in the custom exceptions to make it easier for debugging and troubleshooting.
how to create custom exceptions –
In Android Studio, you can create a custom exception by creating a new class that extends the Exception or RuntimeException class.
For example, to create a custom exception class called MyException, you can create a new class and extend the Exception class:
public class MyException extends Exception {

    public MyException(String message) {
        super(message);
    }
}
You can also include any additional constructors or methods that are specific to your custom exception class.
Once your custom exception class is defined, you can throw an instance of it using the throw keyword. For example:
if (someCondition) {
    throw new MyException("My custom exception message");
}
It’s also important to note that you can use the throws keyword in the method signature to indicate that the method may throw your custom exception.
In addition to this, you can also use the custom exception to handle specific cases in your code, like when some specific argument is passed to the method, you can check for that and throw the custom exception with specific message.
Overall, creating custom exception classes in Android Studio allows you to create exceptions that are specific to your application and provide more meaningful error messages to the user. This can make it easier to troubleshoot and fix issues that occur in your application.
Exceptions best practices java –
Here are some best practices for using custom exceptions in Java:
Use meaningful and accurate error messages: When creating custom exceptions, it’s important to provide meaningful and accurate error messages that clearly indicate the problem that occurred. This makes it easier to troubleshoot and fix issues in the application.
Use standard exception types when possible: It’s best to use the built-in exception classes provided by Java and the Android SDK whenever possible, as they are well-tested and widely understood.
Use custom exceptions judiciously: Custom exceptions should be used only when the built-in exception classes provided by Java are not suitable for the specific error that occurred.
Keep custom exceptions simple: Custom exceptions should be simple and easy to understand, with minimal additional functionality.
Document custom exceptions: Make sure to document custom exceptions, including what they indicate and how they should be handled.
Use appropriate inheritance: Custom exceptions should inherit from the appropriate base class, such as Exception or RuntimeException.
Log exceptions and their details: Log exceptions and their details to help in debugging and troubleshooting.
Don’t swallow exceptions: Do not catch an exception just to suppress it, always handle it or throw it to the upper level.
Use try-with-resources statement: Use try-with-resources statement when working with resources like file, socket, etc.
Provide user-friendly messages: Instead of just showing a generic error message, it’s better to show a user-friendly message that gives the user an indication of what went wrong and what they can do about it.
By following these best practices, developers can create custom exceptions that are clear, accurate, and easy to understand, making it easier to troubleshoot and fix issues in the application.
best youtube video resource to learn more about Exceptions
“Java Exception Handling” by Telusko: This video series provides a comprehensive introduction to exception handling in Java, including try-catch blocks, the throws keyword, and custom exceptions. It is available on YouTube.
“Java Exception Handling” by edureka!: This video tutorial provides a detailed explanation of exception handling in Java, including try-catch blocks, the throws keyword, and custom exceptions. It is available on YouTube.
“Exception Handling in Android” by Coding in Flow: This video tutorial provides an introduction to exception handling in Android, including try-catch blocks and custom exceptions. It is available on YouTube.
“Android Exception Handling” by AndroidHive: This video tutorial provides a detailed explanation of exception handling in Android, including try-catch blocks, the throws keyword, and custom exceptions. It is available on YouTube
“Java Exception Handling Best Practices” by Java Brains: This video tutorial provides an overview of best practices for exception handling in Java, including when to use exceptions, how to create and throw custom exceptions, and how to handle exceptions effectively. It is available on YouTube.
These video resources provide a great starting point for learning more about exceptions in Java and Android development, and the presenter provides a clear and easy to follow explanations.
In conclusion, exceptions are an important aspect of Java and Android development that allow developers to handle errors and exceptional scenarios in a structured way. Java provides a rich set of built-in exception classes that can be used to handle a wide range of errors and exceptional scenarios. However, in some cases, it might be necessary to create custom exception classes to handle specific errors or exceptional scenarios that are specific to the application.
When creating custom exceptions, it’s important to keep them simple, use meaningful and accurate error messages, and use appropriate inheritance. It’s also important to use custom exceptions judiciously, and to use the built-in exception classes provided by Java and the Android SDK whenever possible. Additionally, it’s always a good practice to log exceptions and their details to help in debugging and troubleshooting.
By following these best practices, developers can create custom exceptions that are clear, accurate, and easy to understand, making it easier to troubleshoot and fix issues in the application. It’s also recommended to watch video tutorials and read articles on the topic to get a better understanding of the exceptions and how to use them effectively in their applications.
Want to master the art of handling exceptions in Java and Android development? Check out our latest blog post and subscribe to our newsletter for more tips and tricks on the latest development trends and techniques. Share this post with your friends and let’s learn together! #Java #Android #Exceptions #Development #TipsAndTricks
if you want to read our other posts you can check our blog section.